

Mini-figurine Cataloger and Listing Tracker w/ Hermes Agent
July 6, 2026



Navigation Bar
Apply Theme
- Introduction
- Keywords
- Brands
- Hardware
- Software
- Description
- Development process, linking the Hermes AI agent with an Arduino App Lab application, and final results
- Step 1: Creating the Arduino App Lab application and setting up the electrical components
- Step 2: Collecting audio samples directly from UNO Q via the Edge Impulse CLI
- Step 2.1: Building and training an audio classification model with Edge Impulse
- Step 2.2: Evaluating the model accuracy and deploying the validated model
- Step 3: Programming the Arduino sketch executed by the STM32U585 (MCU)
- Step 4: Programming the Python script (backend) executed by the Qualcomm QRB2210 microprocessor (MPU)
- Step 5: Developing a feature-rich web interface hosted directly by the Arduino App Lab
- Step 5.1: Ensuring the exported App Lab application operates as anticipated
- Step 6: Installing the Hermes AI agent on UNO Q
- Step 6.1: Creating a specific Hermes skill to track mini-figurine listings
- Step 6.2: Setting up Firecrawl to solve web scraping issues
- Step 7: Modeling the mini-figurine cataloger rig 3D components
- Step 7.a.1: Designing the rig base consisting of a rotary platform driven by a worm gear-wheel mechanism and a WS2813 LED strip stand
- Step 7.a.2: Printing and assembling the rig base
- Step 7.b.1: Designing the camera slider based on a GT2 belt-driven mechanism
- Step 7.b.2: Printing and assembling the camera slider
- Step 7.c: Designing and printing custom background magnetic ornaments
- Outcome: Cataloging mini-figurines automatically and the Hermes AI agent-assisted market analysis (eBay and Amazon)
- Scheduling a cron job for tracking listings and further improvements
- Project GitHub Repository
- Schematics
- Code
- Custom assets
- See on other platforms
- Related projects
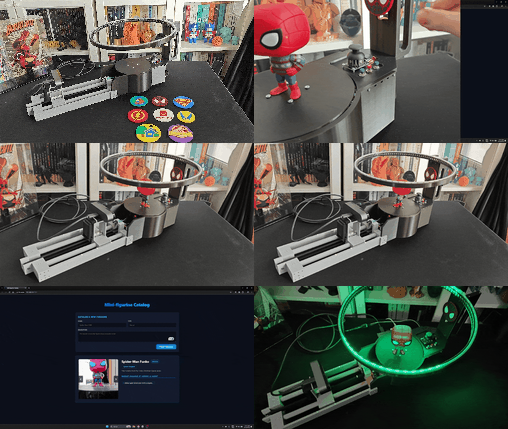
Automatic platform and slider movements to capture 360 degree figurine images. Scheduled listing tracking and feature-rich web interface on UNO Q.
Keywords
Hardware
- 1Arduino UNO Q 4GB
- 1UGREEN 5-in-1 100W USB-C Hub with 4K@60Hz HDMI and 3 * USB-A 3.0
- 1Logitech Brio 4K Ultra HD Webcam
- 1Raspberry Pi 15W 5.1V / 3.0A USB-C Power Supply
- 120W 5V / 4.0A Switching Power Supply (DC Jack)
- 1Pololu DRV8835 Dual Motor Driver Shield
- 1Pololu 100:1 Micro Metal Gearmotor HP 6V
- 1Pololu 298:1 Micro Metal Gearmotor HP 6V
- 2TCRT5000 Infrared Sensor Module
- 1Seeed Studio Grove - WS2813 RGB LED Strip (Waterproof - 60 LED)
- 1Seeed Studio Grove - Electromagnet (5V)
- 1Analog Joystick
- 3IC-177 Push Button (Switch)
- 16803 2RS KWC Groove Ball Bearing (17mm ID)
- 1GT2 16T Passive Idler Pulley with Bearing (3mm Bore)
- 1GT2 Timing Belt
- 1GT2 Aluminium Timing Belt Fixing Piece (Clamp)
- 1Micro Switch with Pulley (KW10-Z5P)
- 1330Ω Resistor
- 1DC Barrel to Wire Jack (Female)
- 2Mini Breadboard
- 1M2 Screws, Nuts, and Washers
- 4M3 Brass Hex Standoff (3cm)
- 1M3 Screws
- 1Jumper Wires
- 1Bambu Lab A1 Combo
Software
Description
As an enduring hobby from my childhood, I have collected a plethora of mini-figurines from different brands, limited editions, categories, and themed production lines over the years, including but not limited to Happy Meal, Kinder Surprise, Funko, and Hasbro. Since I was not able to display all of them due to a lack of available space, I had been mulling over cataloging all of my mini-figurines with extensive detail in the form of a web-based application. Thus, I decided to develop this AI-powered mini-figurine cataloger.
Although I am not keen on selling all of my collection, I wanted to enable the application to track eBay and Amazon listings of the target figurines and the adjacent collectibles to get a grasp of the market price and availability of my collection. Also, I decided to make the application to generate pamphlets (simple HTML pages) for each figurine while conducting market analysis to track new listings.
As I decided to use the Hermes AI agent to track eBay and Amazon listings, my workflow was quite straightforward for market analysis and pamphlet generation, since the Hermes agent provides an intuitive structure for creating skills manually, adjusting them via chat, and scheduling cron jobs for periodic tasks such as processing web-scraped product listings. Even though the Hermes AI agent handles the market analysis, it is not required to execute the mini-figurine cataloging operations since I programmed the application from scratch. To enable the agent to run as deterministically as possible, I tasked it to only update existing listing variables and generate the pamphlet in HTML as a separate file. In this regard, the application can operate without showing any web-scraped listings and is capable of cataloging mini-figurines, even if the Hermes agent is excluded.
I decided to program the web-based mini-figurine cataloger application on Arduino UNO Q by employing the Arduino App Lab development environment, providing foundational building blocks (Bricks). Since UNO Q is a compact but extremely powerful development board, I was able to run the Hermes AI agent locally. Thus, enabling the Hermes agent to update listing information, stored as individual JSON database files for each figurine, was quite straightforward.
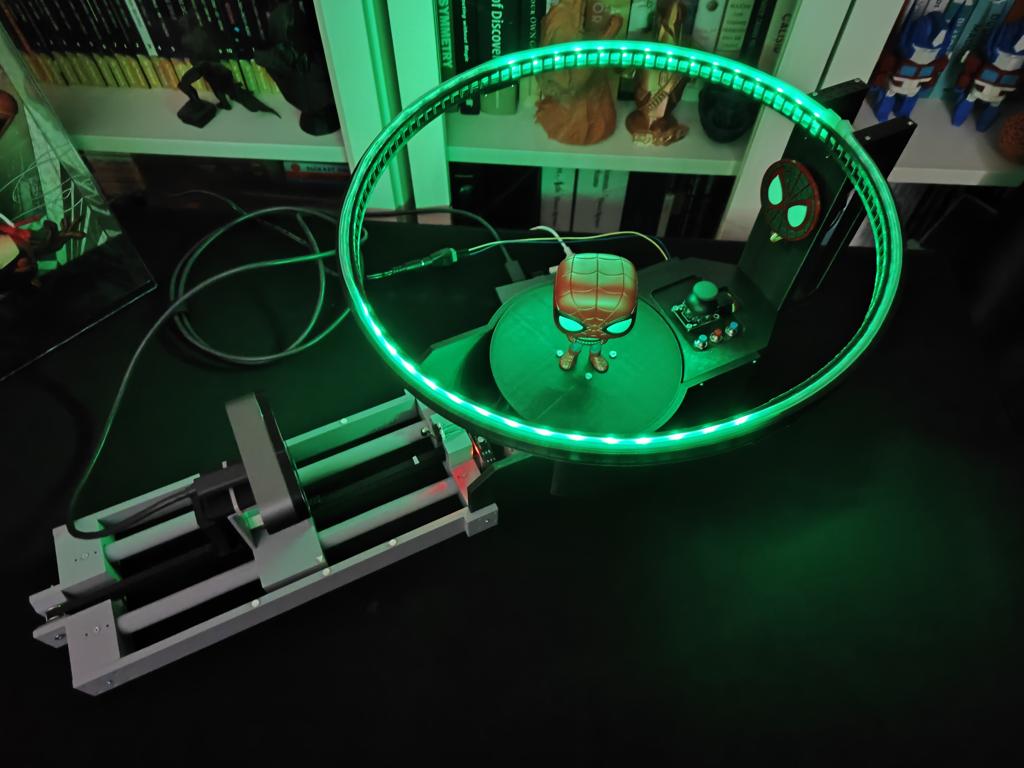
Of course, it would not be a worthy mini-figurine cataloger without the feature of automated yet comprehensive figurine photographing. Thus, I decided to build a rig enabling the App Lab application to capture 360° pictures at varying camera distances automatically. To achieve this automation, I designed a rotary platform swiveling the target mini-figurine and a linear camera slider moving the attached USB camera — Logitech Brio 4K webcam.
Since I wanted to design the rig as compact as possible, I decided to take a different approach for detecting the platform angles and the camera distances, and utilized two TCRT5000 infrared (IR) sensor modules. It is a well-known optical reflective sensor for line tracking robots due to its ability to easily differentiate white from black; the former bounces back IR radiation from the emitter to the phototransistor, while the latter absorbs the IR radiation to the point of avoiding phototransistor trigger. Instead of using stepper motors, I employed two Pololu high-power micro metal gearmotors due to their small footprint.
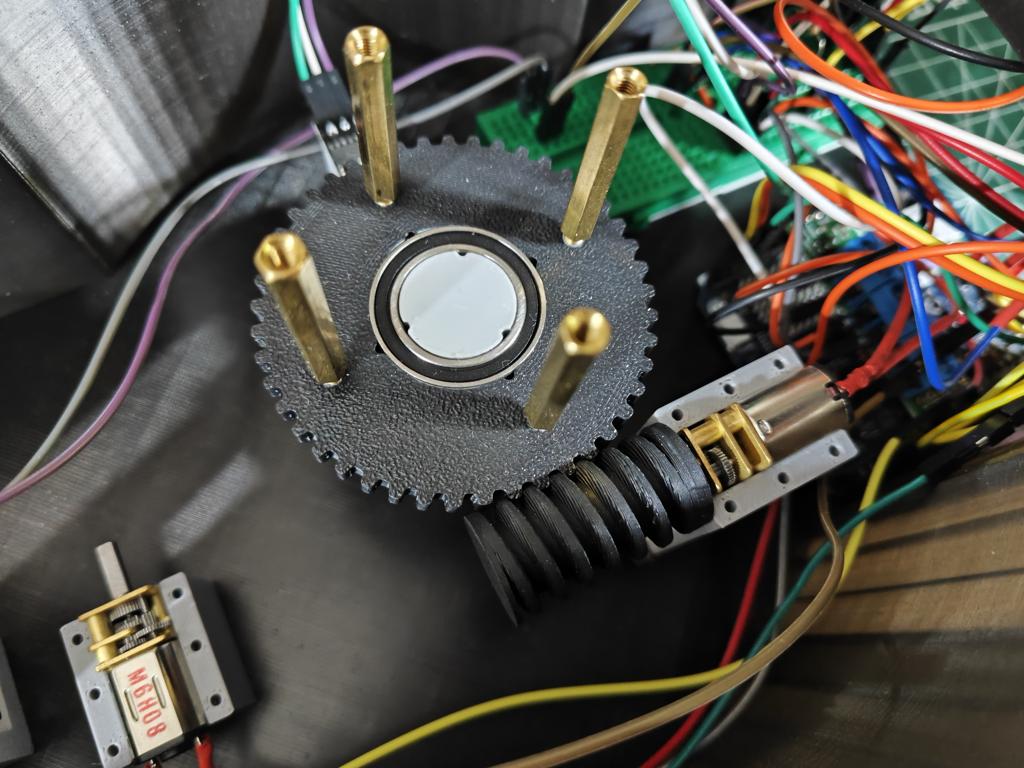
For swiveling the target mini-figurines, I decided to design a rotary platform based on the worm gear-wheel mechanism, which reduces the cataloger rig's footprint considerably and locks the platform base from moving when the cataloger rig is idle, since the worm gear-wheel mechanism is inherently non-back-drivable. For moving the camera slider, I simply designed a GT2 belt-driven mechanism. Since there were no suitable GT2 pulleys for the gearmotors, I modified an existing GT2 20T pulley model to produce a custom 3D-printable one.
While I was working on the cataloger rig design, I decided to lighten the platform base to emphasize the target figurine details, especially for vintage figurines, and create unique background icons related to the figurine category and aesthetic. For the lighting source, I decided to utilize a WS2813 RGB LED strip and enable the user to adjust the lighting manually via buttons or remotely via an RGB color picker wheel presented by the mini-figurine web interface. For the background icons, I decided to design custom magnetic ornaments and added an electromagnet to the rig in order to attach and change the ornaments in accordance with the target figurine effortlessly.


Development process, linking the Hermes AI agent with an Arduino App Lab application, and final results
As mentioned in my previous UNO Q-based project, the development process differs quite a bit from my usual AIoT project development routine since the Arduino App Lab provides all of the required modules, packages, and the built-in Arduino Router background Linux service, constructed to capitalize on the dual-brain (MPU-MCU) nature of UNO Q. Within the confines of the Arduino App Lab development environment, although I still utilized specific programming languages to develop the different aspects of the mini-figurine cataloger App Lab application, Arduino for programming the STM32 microcontroller (MCU), Python for the application backend (Qualcomm MPU), and HTML, CSS, JavaScript for the web interface, as a whole, I built a single application that the App Lab runs and manages.
Considering the usage of the built-in Bricks (Docker containers) and web socket, I highly recommend inspecting the official Arduino UNO Q specifications and tutorials.

I specifically constructed the data structure of the web interface to enable the Hermes AI agent to update the web-scraped listing information for each cataloged mini-figurine. Instead of utilizing the built-in SQL database, I enabled the web interface to generate two JSON files consisting of mini-figurine status and listing information, respectively. In this regard, the Hermes agent can read and construe the given figurine information from the associated JSON database file, and then append the processed web-scraped listing information into the associated JSON database file.
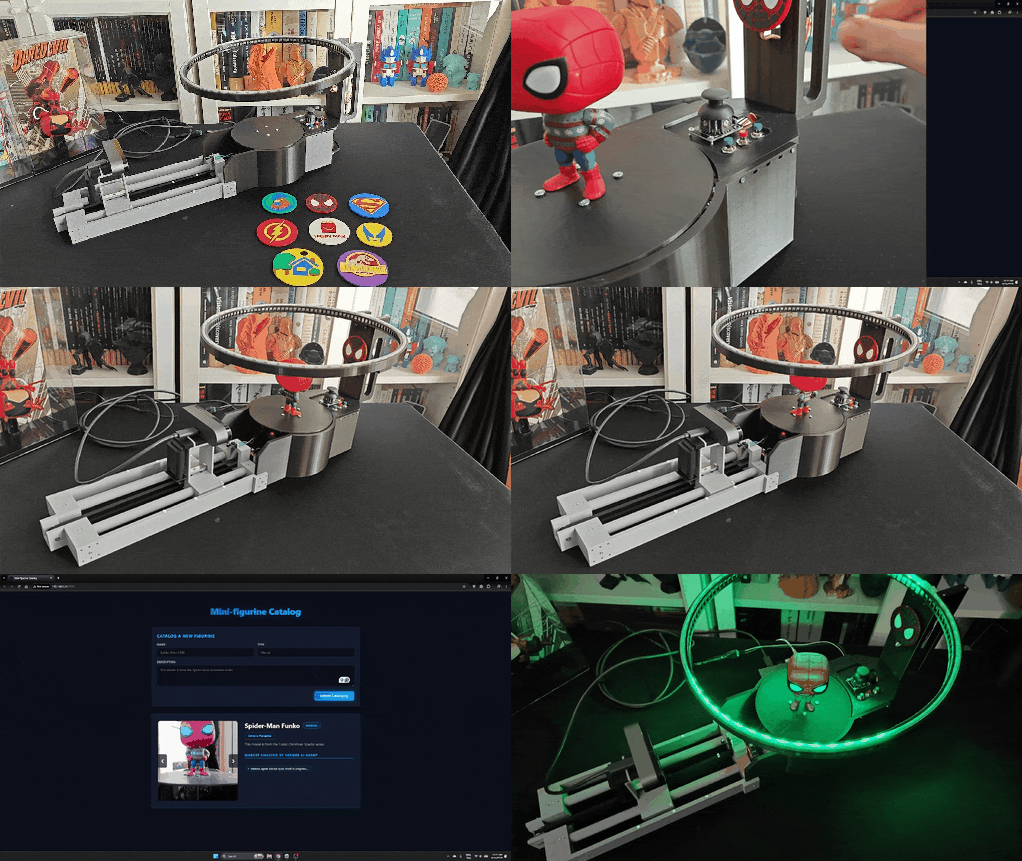
I documented the overall development process for the finalized mini-figurine cataloger features in the following written tutorial. For a brief overview, you can inspect the project demonstration video with timestamps.
Step 1: Creating the Arduino App Lab application and setting up the electrical components
First, I collected the electrical components I needed to achieve the mini-figurine cataloger rig features I envisioned and defined the UNO Q-component pin connections. Since UNO Q has the exact same pinout as the usual Arduino Uno, declaring pin connections was quite straightforward.
I specifically selected the Pololu DRV8835 dual motor driver shield to control two micro metal gearmotors (also from Pololu) since this shield is tailored to the Arduino Uno.
// Connections
// Arduino UNO Q :
//                                Pololu DRV8835 Dual Motor Driver Shield
// D9      ------------------------ Motor_1 [Speed]
// D7      ------------------------ Motor_1 [Direction]
// D10     ------------------------ Motor_2 [Speed]
// D8      ------------------------ Motor_2 [Direction]
//                                TCRT5000 Infrared Sensor Module [First]
// GND     ------------------------ GND
// 5V      ------------------------ VCC
// A2      ------------------------ OUT
//                                TCRT5000 Infrared Sensor Module [Second]
// GND     ------------------------ GND
// 5V      ------------------------ VCC
// A3      ------------------------ OUT
//                                Grove - Electromagnet (5V)
// GND     ------------------------ GND
// 5V      ------------------------ VCC
// D12     ------------------------ SIG
//                                Grove - WS2813 RGB LED Strip (Waterproof - 60 LED)
// D11     ------------------------ Data
//                                Analog Joystick
// GND     ------------------------ GND
// 5V      ------------------------ +5V
// A4      ------------------------ VRX
// A5      ------------------------ VRY
// D2      ------------------------ SW
//                                Control Button (A)
// D3      ------------------------ +
//                                Control Button (B)
// D4      ------------------------ +
//                                Control Button (C)
// D5      ------------------------ +
//                                Micro Switch with Pulley (KW10-Z5P)
// D13     ------------------------ +
#️⃣ Since the Pololu DRV8835 motor driver shield comes disassembled, I soldered its components to complete the PCB via my TS100 soldering iron. Also, I soldered male jumper wires to the Pololu micro gearmotors to be able to connect them easily to the dedicated screw terminal blocks on the shield.
#️⃣ To connect the IC-177 push buttons to the UNO Q, I also soldered male jumper wires. To insulate all wire connections, I utilized heat-shrink tubing.


#️⃣ To provide stable 5V to gearmotors through the driver shield, the Grove electromagnet, and the Grove WS2813 RGB LED strip, I employed an external 5V / 4.0A switching power supply with a DC jack. To make this external power supply breadboard-friendly, I utilized a female DC-barrel-to-wire jack, splitting positive (5V) and ground (GND) wire lines.
#️⃣ After declaring the pin layout and connecting the electrical components to the UNO Q for initial testing, I created the mini-figurine cataloger App Lab application.
#️⃣ While testing the LED strip, I noticed that the first LED always turns green permanently due to signal noise (fluctuations). Thus, I added a 330 Ohm resistor to the signal (data) line of the LED strip, connected to the UNO Q, to avoid current fluctuations.


#️⃣ Then, I installed the required sketch libraries. Thankfully, all libraries were available in the provided App Lab library collection, so I did not need to modify any libraries due to incompatibilities.
#️⃣ If you encounter errors regarding the Arduino_RouterBridge library, download it manually since it was removed from the later versions of the bundled Zephyr platform (Arduino UNO Q Board).
📚 DRV8835MotorShield | Inspect
📚 Adafruit NeoPixel | Inspect
📚 Arduino_RouterBridge | Inspect


#️⃣ To develop mini-figurine cataloger features, I added these Bricks.
Basically, Bricks are pre-configured services and Docker containers to add various features to a custom App Lab application. Each Brick provides a specific set of capabilities that are executed by the Qualcomm MPU (Linux) and can be accessed by the Python script (backend) of the application via the built-in high-level APIs.


Step 2: Collecting audio samples directly from UNO Q via the Edge Impulse CLI
Since some of my mini-figurines do not have a stable base, they are prone to falling while the rotary platform swivels. Thus, I decided to build an audio classification model to detect figurine falls in order to suspend the cataloging process to let the user reposition the figurine and resume the process without producing unsolicited figurine photographs.
Fortunately, the Logitech Brio 4K USB webcam comes with a built-in microphone. Thus, I was able to collect audio samples directly from the UNO Q and run the trained audio classification model on the Arduino App Lab without needing a secondary microphone.
#️⃣ First, I signed in to my Arduino account on the Arduino App Lab, which is required to deploy and run EI models on the App Lab through the provided Bricks, in this case, the Audio Classification Brick.


#️⃣ Then, I created a new project on my Edge Impulse Enterprise account and selected the target development board as Arduino UNO Q.


#️⃣ Although there is a built-in pipeline to obtain trained Edge Impulse models, the App Lab does not let the user collect samples directly from Arduino UNO Q yet. Thus, I set up the Edge Impulse CLI on the UNO Q via the built-in App Lab terminal to be able to access video and audio streams produced by the Brio webcam on the Edge Impulse Studio.
sudo apt update
curl -sL https://deb.nodesource.com/setup_20.x | sudo bash -
sudo apt install -y gcc g++ make build-essential nodejs sox gstreamer1.0-tools gstreamer1.0-plugins-good gstreamer1.0-plugins-base gstreamer1.0-plugins-base-apps
sudo npm install edge-impulse-linux -g --unsafe-perm


#️⃣ After setting up the Edge Impulse CLI, I connected to my Edge Impulse account, selected the associated project, assigned the Logitech Brio webcam's built-in microphone as the primary audio source, and name the device.
edge-impulse-linux


#️⃣ Nonetheless, as I was trying to collect audio samples on the built-in App Lab terminal, I encountered some connection issues. Thus, I resumed collecting audio samples on the native terminal in the SBC mode.


#️⃣ After moving to the SBC mode, I was able to see the UNO Q on the Edge Impulse Studio without any connection errors and start collecting audio samples while providing labels and sample durations.


#️⃣ Since the gearmotors driving the worm gear and the custom GT2 pulley work continuously while cataloging the target mini-figurines, I collected audio of gearmotors turning as the background noise (normal) samples. I chose the background noise sample duration as 5 seconds, as this state should be the norm for the neural network model.


#️⃣ Then, I collected audio of figurines falling at different angles and heights to construct an extensive dataset. I selected the sample duration as 2 seconds since the falling happens abruptly without many repetitions.


After collecting training and testing audio samples for both labels, I completed my dataset for detecting figurine falls.
- background_noise
- model_fall
To utilize the advanced AI tools provided by Edge Impulse, you can register here.
For further information, you can inspect this audio classification model on Edge Impulse as a public project.

Step 2.1: Building and training an audio classification model with Edge Impulse
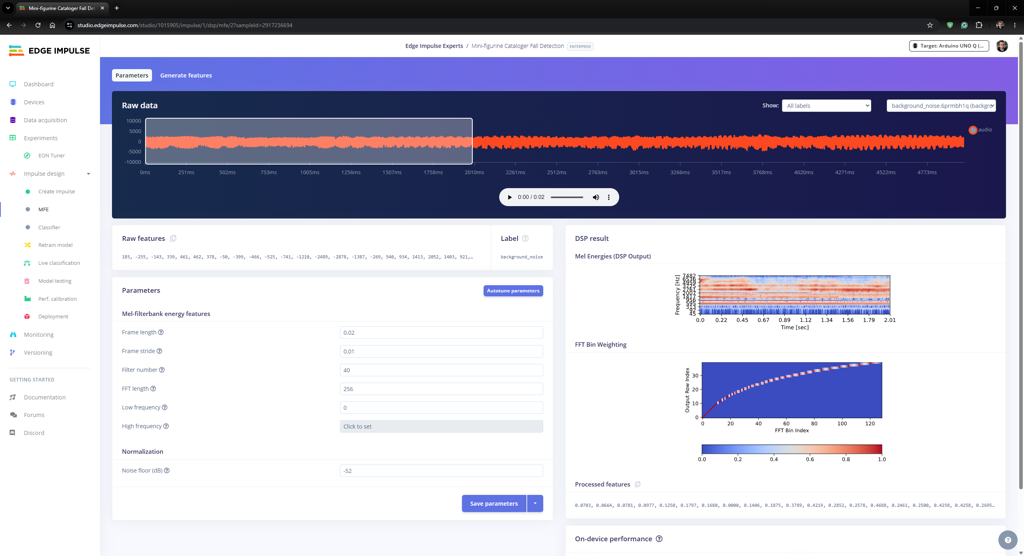
An impulse (an application developed and optimized by Edge Impulse) takes raw data, applies signal processing to extract features, and then utilizes a learning block to classify new data.
For my application, I created the impulse by employing the Audio (MFE) processing block and the Classification learning block.
Edge Impulse supports splitting raw audio samples into multiple windows by adjusting the parameters of the Time series data inputs.
- Window size — size of data that will be processed per classification, in milliseconds
- Window increase (stride) — sliding window in milliseconds to go over longer samples
MFE (Mel Frequency Energy) signal processing block simplifies the generated raw audio windows, which contain a large amount of redundant information.
Classification learning block represents an officially supported Keras neural network model.
#️⃣ First, I opened the Impulse design ➡ Create impulse section and selected the mentioned blocks. I left the block configurations as defaults. To complete the impulse creation, I clicked Save Impulse.


#️⃣ To modify the raw audio features in the applicable format, I navigated to the Impulse design ➡ MFE section and clicked Save parameters to apply default settings.

#️⃣ Then, I proceeded to click Generate features to extract the required features for training by applying the MFE signal processing block.


#️⃣ After extracting features successfully, I navigated to the Impulse design ➡ Classifier section and applied the default neural network settings and architecture to achieve reliable accuracy and validity.
#️⃣ After training the audio classification model, Edge Impulse evaluated the accuracy as 95.5%. This precision score, although really close to the final testing results, should be viewed as a narrow estimation due to the modest validation set.


Step 2.2: Evaluating the model accuracy and deploying the validated model
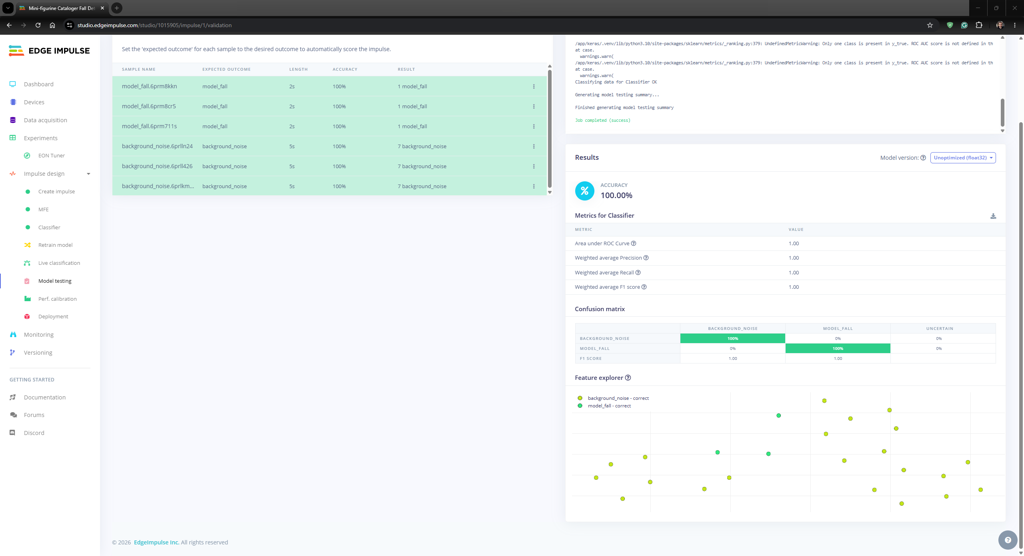
#️⃣ First, to obtain the validation score of the trained model based on the provided testing samples, I navigated to the Impulse design ➡ Model testing section and clicked Classify all.
#️⃣ After applying the trained model to the testing samples, Edge Impulse evaluated the model accuracy as 100.00%.


#️⃣ To deploy the validated model optimized for my hardware, I navigated to the Impulse design ➡ Deployment section and searched for UNO Q.
#️⃣ I chose the Quantized (int8) model variant (optimization) to achieve the optimal performance while running the deployed model.
#️⃣ Finally, I clicked Build to deploy the model. However, contrary to the usual deployment procedure, I did not utilize the downloaded EIM binary since the Arduino App Lab provides a pipeline to link Edge Impulse projects to import deployed models directly.


#️⃣ As mentioned in the previous steps, I had already signed in to my Arduino account on the Arduino App Lab. Thus, I only needed to click Go to Arduino and open the App Lab to link this Edge Impulse project to my Arduino account via the built-in pipeline.
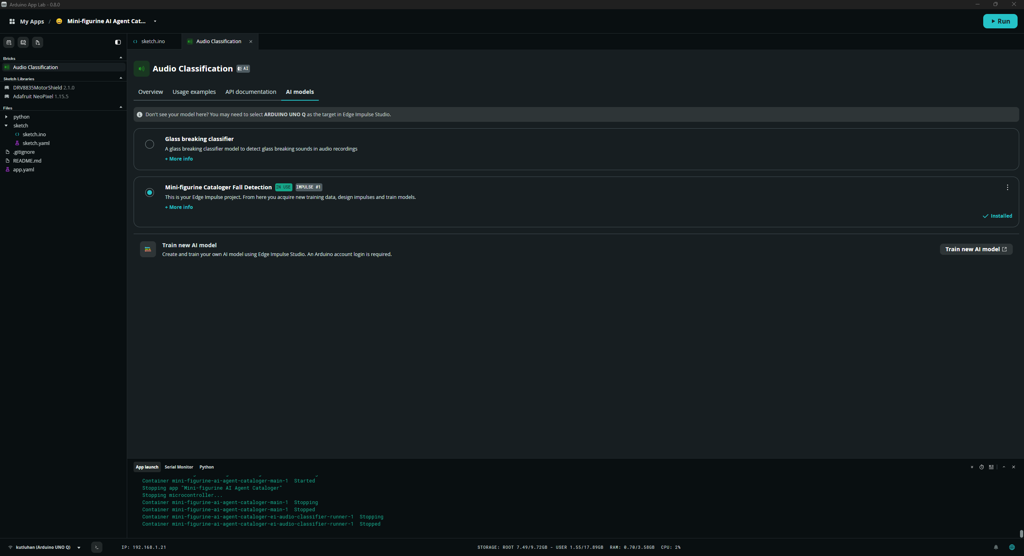
#️⃣ After linking the project, I navigated to the Audio Classification Brick configurations, installed my audio classification model for detecting figurine falls, and selected it as the primary Brick model.


Step 3: Programming the Arduino sketch executed by the STM32U585 (MCU)
📁 sketch.ino
⭐ Include the required sketch libraries.
#include <Arduino_RouterBridge.h>
#include <DRV8835MotorShield.h>
#include <Adafruit_NeoPixel.h>
⭐ Declare the micro DC gearmotor class instance.
⭐ For Pololu gearmotors attached to the Pololu DRV8835 dual motor driver shield, the speed values should be between -400 and 400. The motors brake at 0 speed.
⭐ Positive speeds correspond to motor current flowing from M*A to M*B. Negative speeds correspond to motor current flowing from M*B to M*A.
DRV8835MotorShield gear_motors;
⭐ Define the required configurations for the Grove WS2813 RGB LED strip. While declaring the neopixel class instance, utilize the 800 kHz protocol required for WS2813/WS2812B LED strips.
#define led_data_pin             D11
#define strip_led_num            60
#define strip_seq_part           4
Adafruit_NeoPixel strip(strip_led_num, led_data_pin, NEO_GRB + NEO_KHZ800);
⭐ Define an array consisting of predefined pixel (LED) colors for the LED strip. The last array item is a placeholder color that is revised by the RGB color picker wheel on the web interface.
const int pixel_col_num = 15;
int pixel_color[pixel_col_num][3] = {{255,0,0}, {255,92,0}, {0,255,0}, {0,250,154}, {113,252,0}, {0,0,255}, {255,255,0}, {27,36,82}, {255,0,255}, {128,0,128}, {255,0,127}, {0,255,255}, {255,255,255}, {81,81,81}, {150,150,150}};
⭐ Declare a struct containing all of the cataloger rig operation states.
struct operation_state {
  volatile boolean init_cataloging = false,
                   suspend_cataloging = false,
                   capture_request_sent = false,
                   fall_detected = false,
                   find_platform_position = false,
                   find_slider_position = false,
                   init_homing = false;
  int platform_position = 0,
      slider_position = 0,
      last_platform_position = 4,
      last_slider_position = 3;
};
⭐ Declare a struct containing gearmotor speed, ongoing platform movement, and ongoing slider movement variables.
struct _motors {
  int platform_speed = 400,
      slider_speed = -100;
  volatile boolean slider_tracking_offset = false,
                   slider_start_offset = false,
                   platform_tracking_offset = false,
                   platform_start_offset = false;
  unsigned long offset_count = 0,
                offset_time_p = 1000000 * 2,
                offset_time_s = 1000000 * 3;
};
⭐ Initiate the Arduino Router background Linux service to borrow and run functions between Qualcomm MPU and STM32 MCU interchangeably.
Bridge.begin();
⭐ Initiate the integrated App Lab serial monitor for debugging of the requested tasks.
Serial.begin();
⭐ Employ the Arduino Router background Linux service to enable Qualcomm MPU to borrow and run these functions on the STM32 MCU.
  Bridge.provide("handle_rig_operation_commands", handle_rig_operation_commands);
  Bridge.provide("update_led_sequence_by_interface", update_led_sequence_by_interface);
⭐ In the get_infrared_values function, obtain the states of the two TCRT5000 infrared sensors and the micro switch.
void get_infrared_values(boolean _debug){
  infrared_sensor_1_val = digitalRead(infrared_sensor_1_pin);
  infrared_sensor_2_val = digitalRead(infrared_sensor_2_pin);
  micro_swicth_val  = digitalRead(micro_switch_pin);

  if(_debug){ Serial.print(infrared_sensor_1_val); Serial.print("\t\t"); Serial.print(infrared_sensor_2_val); Serial.print("\t\t"); Serial.println(micro_swicth_val); }
}
⭐ In the figurine_cataloging_rig_operations function:
⭐ Initiate the automatic figurine cataloging procedure executed by Qualcomm MPU and STM32 MCU simultaneously.
⭐ Initiate the homing process for the camera slider, which checks whether the camera holder makes contact with the micro switch and suspends the code flow until it does.
⭐ Once the homing process is completed, move the camera holder to the subsequent predefined distance relative to the rotary platform.
#️⃣ As explained in the following steps, I utilized the second infrared sensor to detect the relative camera holder distance by marking the black GT2 timing belt with white electrical tape. Thus, to avoid detecting the same marker while tracking the next marker, I added an offset (padding) duration once the first slider position is found. The function waits until the given offset time passes before starting to track the successive position marker.
⭐ Once the camera slider position is found, enable finding the next rotary platform angle: 0°, 90°, 180°, 270°.
#️⃣ As mentioned earlier, I decided to detect figurine falls via an audio classification neural network model. Thus, I enabled the function to check the EI model detection results as rotating the platform. If a fall is detected, the function immediately stops the code flow and waits until the user manually confirms that the target figurine placement is corrected.
#️⃣ Similar to the slider position markers, I utilized printed white points on the worm wheel to determine the angle of the rotary platform via the first infrared sensor. Thus, to avoid detecting the same point while tracking the next point, I added an offset (padding) duration once the first platform angle is found. The function waits until the given offset time passes before starting to track the successive angle point.
⭐ Once the platform angle is found, suspend the cataloging procedure and inform the Python backend to capture an image of the target figurine at the current platform angle and camera slider position (distance) by executing the borrowed function on the Qualcomm MPU.
⭐ Once the Python backend sends the confirmation, proceed with the cataloging procedure by finding the successive rotary platform angle.
⭐ After exhausting all platform angles at the current camera distance, proceed with the cataloging procedure by finding the successive camera slider position (distance). Then, restart finding platform angles and capturing figurine pictures.
⭐ After exhausting all predefined camera distances, conclude the cataloging procedure.
void figurine_cataloging_rig_operations(boolean _debug){
  // Initiate the automatic figurine cataloging procedure.
  if(operation_state.init_cataloging){
    // Obtain infrared sensor and micro switch values.
    get_infrared_values(!_debug);
    // Initiate the homing process for the camera slider.
    if(operation_state.init_homing){
      if(micro_swicth_val){
        gear_motors.setM2Speed(_motors.slider_speed);
        if(_debug) Serial.println("Slider homing initiated!");
      }else{
        operation_state.init_homing = false;
        gear_motors.setM2Speed(0);
        if(_debug) Serial.println("Slider homing completed!");
      }
    }
    // Proceed cataloging once the camera slider homing process is completed.
    else{
      // Move the camera slider to the next position relative to the rotary platform.
      if(operation_state.find_slider_position){
        // Move the camera slider.
        gear_motors.setM2Speed(-_motors.slider_speed);
        // If the first slider position is found, wait until the given offset time passes before starting tracking the next position marker with the TCRT5000 infrared sensor in order to avoid detecting the same marker.
        if(_motors.slider_tracking_offset){
          if(_motors.slider_start_offset){
            _motors.offset_count = micros();
            _motors.slider_start_offset = false;
          }
          if(micros() - _motors.offset_count <= _motors.offset_time_s){
            if(_debug) Serial.println("Slider offsetting positioning!");
            return;
          }else{
            _motors.slider_tracking_offset = false;
            _motors.slider_start_offset  = false;
          }
        }
        // Continue tracking position marker.
        if(_debug) Serial.println("Slider next position finding!");
        // Once the associated infrared sensor finds a slider position point by tracking black lines, increase the slider position number accordingly.
        if(infrared_sensor_2_val){
          gear_motors.setM2Speed(0);
          operation_state.slider_position++;
          operation_state.find_slider_position = false;
          if(_debug) Serial.println("Slider position ["+ String(operation_state.slider_position) +"] found!");
          // Activate tracking offset for the next marker.
          _motors.slider_tracking_offset = true;
          _motors.slider_start_offset  = true;
        }
      }
      // Wait until the requested slider position is found.
      else{
        // Find the next rotary platform position (angle) - 0°, 90°, 180°, 270°.
        if(operation_state.find_platform_position){
          // While finding the next angle, check whether the EI audio classification model detected that the target figurine fell during rotating. If so, wait until user confirmation that the figurine is placed precisely.
          if(operation_state.fall_detected){
            gear_motors.setM1Speed(0);
            if(_debug) Serial.println("EI model => Figurine fall detected!");
            return;
          }
          // Move the rotary platform.
          gear_motors.setM1Speed(_motors.platform_speed);
          // If the first platform angle is found, wait until the given offset time passes before starting tracking the next angle marker with the TCRT5000 infrared sensor in order to avoid detecting the same marker.
          if(_motors.platform_tracking_offset){
            if(_motors.platform_start_offset){
              _motors.offset_count = micros();
              _motors.platform_start_offset = false;
            }
            if(micros() - _motors.offset_count <= _motors.offset_time_p){
              if(_debug) Serial.println("Platform offsetting positioning!");
              return;
            }else{
              _motors.platform_tracking_offset = false;
              _motors.platform_start_offset  = false;
            }
          }
          // Proceed if all conditions are met.
          if(_debug) Serial.println("Platform next position finding!");
          // Once the associated infrared sensor finds a platform angle by tracking black lines, increase the platform position number accordingly.
          if(infrared_sensor_1_val){
            gear_motors.setM1Speed(0);
            operation_state.platform_position++;
            operation_state.find_platform_position = false;
            // Suspend the cataloging procedure until the Python backend handles the requested operations.
            operation_state.suspend_cataloging = true;
            if(_debug) Serial.println("Platform position ["+ String(operation_state.platform_position) +"] found!");
            // Activate tracking offset for the next marker.
            _motors.platform_tracking_offset = true;
            _motors.platform_start_offset  = true;
          }
        }
        // Wait until the requested platform angle is found.
        else{
          // Inform the Python backend to capture an image of the target figurine at the current platform angle and camera position.
          if(operation_state.suspend_cataloging){
            if(!operation_state.capture_request_sent){
              // Execute the borrowed function on the Qualcomm MPU to capture a figurine image with the current positioning settings.
              operation_state.capture_request_sent = true;
              Bridge.call("capture_and_save_img", operation_state.platform_position, operation_state.slider_position);
            }
          }
          // Once the Python backend sends the confirmation, proceed the cataloging procedure by finding the successive rotary platform angle.
          else{
            operation_state.find_platform_position = true;
            // However, return to finding the successive camera slider position if the rotary platform is already at its last angle.
            if(operation_state.platform_position == operation_state.last_platform_position){
              // If the camera slider is also at its last position, complete the cataloging process.
              if(operation_state.slider_position == operation_state.last_slider_position){
                end_figurine_cataloging(_debug);
              }
              // If not, move to the slider position while restarting platform angles.
              else{
                operation_state.platform_position = 0;
                operation_state.find_slider_position = true;
              }
            }
          }
        }
      }
    }
  }
⭐ In the end_figurine_cataloging function, update all cataloger rig operation states to their default values and inform the Python backend that the rig figurine cataloging procedure is completed.
void end_figurine_cataloging(boolean _debug){
  // Update all operation states to their default values.
  operation_state.init_cataloging = false;
  operation_state.suspend_cataloging = false;
  operation_state.capture_request_sent = false;
  operation_state.fall_detected = false;
  operation_state.find_platform_position = false;
  operation_state.find_slider_position = false;
  operation_state.init_homing = false;
  operation_state.platform_position = 0;
  operation_state.slider_position = 0;
  _motors.platform_tracking_offset = true;
  _motors.platform_start_offset  = true;
  _motors.slider_tracking_offset = false;
  _motors.slider_start_offset  = false;
  // Inform the Python backend that the rig figurine cataloging operation are completed.
  Bridge.call("rig_operation_completed");
  if(_debug) Serial.println("\nFigurine cataloging rig operations completed!");
  return;
}
⭐ In the show_strip_sequence function, according to the given strip sequence (by angles) and the pixel color (RGB), both can be adjusted manually (predefined) or be updated via the web interface, update the states of the 60 pixels (LEDs) of the WS2813 LED strip.
void show_strip_sequence(){
  strip.clear();
  if(strip_sequence == 0){
    // Pass.
  }else if(strip_sequence == 5){
    for(int i = 0; i<(strip_led_num/strip_seq_part); i++){
      strip.setPixelColor(i, strip.Color(pixel_color[active_seq_col][0], pixel_color[active_seq_col][1], pixel_color[active_seq_col][2]));
    }
    for(int i = 2*(strip_led_num/strip_seq_part); i<3*(strip_led_num/strip_seq_part); i++){
      strip.setPixelColor(i, strip.Color(pixel_color[active_seq_col][0], pixel_color[active_seq_col][1], pixel_color[active_seq_col][2]));
    }
   }else if(strip_sequence == 6){
    for(int i = (strip_led_num/strip_seq_part); i<2*(strip_led_num/strip_seq_part); i++){
      strip.setPixelColor(i, strip.Color(pixel_color[active_seq_col][0], pixel_color[active_seq_col][1], pixel_color[active_seq_col][2]));
     }
    for(int i = 3*(strip_led_num/strip_seq_part); i<4*(strip_led_num/strip_seq_part); i++){
      strip.setPixelColor(i, strip.Color(pixel_color[active_seq_col][0], pixel_color[active_seq_col][1], pixel_color[active_seq_col][2]));
    }
   }else if(strip_sequence == 7){
     for(int i = 0; i<strip_led_num; i++){
       strip.setPixelColor(i, strip.Color(pixel_color[active_seq_col][0], pixel_color[active_seq_col][1], pixel_color[active_seq_col][2]));
     }
  }else{
    for(int i = (strip_sequence-1)*(strip_led_num/strip_seq_part); i<(strip_sequence)*(strip_led_num/strip_seq_part); i++){
      strip.setPixelColor(i, strip.Color(pixel_color[active_seq_col][0], pixel_color[active_seq_col][1], pixel_color[active_seq_col][2]));
    }
  }
  strip.show();
  // Return to the idle strip state.
  strip_state_change = false;
}
⭐ According to the estimated potentiometer values of the analog joystick axes, manually control the micro DC gearmotor movements through the Pololu DRV8835 dual motor driver.
⭐ If the joystick button is pressed, halt (break) the DC gear motors, manually activate the electromagnet, and confirm that the target figurine position is corrected after fall detection.
  if(joystick_val_x != -1 && joystick_val_x < 200){ gear_motors.setM2Speed(400); delay(m_delay); }
  if(joystick_val_x > 900){ gear_motors.setM2Speed(-400); delay(m_delay); }
  // While adjusting the rotating table position.
  if(joystick_val_y != -1 && joystick_val_y < 200){ gear_motors.setM1Speed(200); delay(m_delay); }
  if(joystick_val_y > 900){ gear_motors.setM1Speed(-200); delay(m_delay); }
  // If the joystick button is pressed, halt (break) the DC gear motors manually.
  if(!digitalRead(joystick_sw)){
    gear_motors.setSpeeds(0, 0); delay(m_delay);
    // Manually, activate the electromagnet.
    electromagnet_state = true;
    // Manually, confirm the figurine placed precisely after fall detection.
    operation_state.fall_detected = false;
  }
⭐ Once the control button B is pressed, change the activated pixel color by increasing the selected item number from the predefined RGB color array. Also, deactivate the electromagnet manually.
  if(!digitalRead(control_button_B)){
    active_seq_col++;
    if(active_seq_col > pixel_col_num-1) active_seq_col = 0;
    strip_state_change = true;
    delay(led_delay);
    // Manually, deactivate the electromagnet.
    electromagnet_state = false;
  }
⭐ Once the control button A or C is pressed, update the activated strip sequence (by angles) accordingly, controlling 60 available pixels — LEDs.
  if(!digitalRead(control_button_A)){
    strip_sequence++;
    if(strip_sequence > sequence_num) strip_sequence = 0;
    strip_state_change = true;
    delay(led_delay);
  }
  if(!digitalRead(control_button_C)){
    strip_sequence--;
    if(strip_sequence < 0) strip_sequence = sequence_num;
    strip_state_change = true;
    delay(led_delay);
  }
⭐ Once the LED strip parameters (pixel color or sequence) are altered, show them on the LED strip immediately.
  if(strip_state_change){
    show_strip_sequence();
  }
⭐ Functions provided to the integrated Arduino Router background Linux service in order to allow the Python backend to update the cataloger rig operation states and the LED strip parameters.
void handle_rig_operation_commands(String command){
  if(command == "init"){
    operation_state.init_cataloging = true;
    operation_state.find_platform_position = true;
    operation_state.find_slider_position = true;
    operation_state.init_homing = true;
  }else if(command == "img_captured"){
    operation_state.suspend_cataloging = false;
    operation_state.capture_request_sent = false;
  }else if(command == "fall_detected"){
    operation_state.fall_detected = true;
  }
}

void update_led_sequence_by_interface(int new_sequence, int r, int g, int b){
  strip_sequence = new_sequence;
  active_seq_col = pixel_col_num-1;
  pixel_color[active_seq_col][0] = r; pixel_color[active_seq_col][1] = g; pixel_color[active_seq_col][2] = b;
  strip_state_change = true;
}


Step 4: Programming the Python script (backend) executed by the Qualcomm QRB2210 microprocessor (MPU)
According to the App Lab application structure, this Python script behaves as the application backend and manages all data transfer processes, Brick features, and interconnected services.
📁 main.py
⭐ Include the required system and high-level Brick libraries.
from arduino.app_bricks.audio_classification import AudioClassification
from arduino.app_bricks.web_ui import WebUI
from arduino.app_utils import App, Bridge
from datetime import datetime
from time import sleep
import os
import json
import cv2
import glob
#️⃣ To bundle all the functions to write a more concise script, I used a Python class.
⭐ In the __init__ function:
⭐ Initiate the built-in WebUI Brick and declare the mini-figurine cataloger web interface's root folder path, which handles hosting the web interface.
⭐ Via the WebUI Brick, expose HTTP GET REST API endpoints to construct an extensive cataloger REST API to enable the web interface to execute backend functions and establish two-way data transfer via the provided URL (query) parameters. The Brick achieves this by executing the assigned Python functions every time the exposed endpoints are called.
⭐ In this case, using lambda is the most resource-efficient option to pass query parameters to the assigned function.
⭐ As the WebUI Brick establishes a WebSocket automatically, it allows the Python script to listen to WebSocket messages from the client (web interface) as the server and call assigned functions accordingly to process the transferred message (dictionary).
⭐ Declare the figurine information holders, including the fundamental JSON database file names.
⭐ Once requested, initialize the integrated audio classifier instance for the provided Edge Impulse audio classification model for detecting figurine falls, utilizing the built-in microphone of the Logitech Brio USB webcam. Then, declare the callback function triggered once the provided EI model detects a figurine fall.
⭐ Employ the Arduino Router background Linux service to enable the STM32 MCU to borrow and run the provided functions on the Qualcomm MPU.
    def __init__(self, activate_fall_detection, _confidence):
        # Declare the integrated WebUI Brick class instance to initiate the custom mini-figurine cataloger web interface.
        self.web_ui = WebUI(assets_dir_path="/app/mini_figurine_catalog")
        # Expose REST API endpoints (HTTP GET or POST) to construct an extensive cataloger REST API to enable the web interface to execute backend functions and establish two-way data transfer via the provided URL (query) parameters.
        self.web_ui.expose_api("GET", "/initiate_cataloging", lambda name, description, type: self.initiate_cataloging(name, description, type))
        self.web_ui.expose_api("GET", "/status_updates", self.rest_api_status_updates)
        self.web_ui.expose_api("GET", "/produce_html_figurine_cards", self.produce_html_figurine_cards)
        # Listen WebSocket messages from the client (web interface).
        self.web_ui.on_message("update_led_sequence_and_color", self.update_led_sequence_and_color)
        # Declare the essential figurine information holders.
        self.figurine_info = None
        self.figurine_image_captured = False;
        self.root_folder = "mini_figurine_catalog/"
        self.status_json = "status.json"
        self.hermes_json = "hermes_updates.json"
        # Declate initial operation updates.
        self.figurine_op_status = {"operation": "waiting"}

        if(activate_fall_detection):
            # Initialize the integrated audio classifier instance for the provided Edge Impulse audio classification model, utilizing the built-in microphone of the Logitech Brio USB camera.
            self.ei_audio_classifier = AudioClassification(confidence=_confidence)
            # Define the callback function triggered once the provided EI model detects a figurine fall.
            self.ei_audio_classifier.on_detect("model_fall", inform_figurine_fall)

        # Employ the Arduino Router background Linux service to enable STM32 MCU to borrow and run these functions on Qualcomm MPU.
        Bridge.provide("capture_and_save_img", self.capture_and_save_img)
        Bridge.provide("rig_operation_completed", self.rig_operation_completed)
⭐ In the initiate_cataloging function:
⭐ Obtain the provided HTTP GET (URL) query parameters - names must be predefined and cannot be unknown.
⭐ Create the necessary folders and subfolders to contain mini-figurine assets.
⭐ Restore the given target figurine information for further operations.
⭐ Get the figurine cataloging date in the required format.
⭐ Produce the ongoing backend operation updates with the provided figurine information, which will be shown as real-time REST API status updates.
⭐ Then, create the status database JSON file containing the provided figurine information and operation updates under the created folder.
⭐ Also, create the hermes database JSON file for eBay and Amazon listings, which will be updated later by the Hermes AI agent.
⭐ Initiate the mini-figurine cataloging operations on the cataloger rig by calling the borrowed function on the STM32 microcontroller.
⭐ Return the produced status updates as the response message to this API call.
    def initiate_cataloging(self, name, description, type):
        # Obtain the provided HTTP GET (URL) query parameters - names must be predefined and cannot be unknown.
        print("\nFigurine Name: " + name + "\nFigurine Description: " + description + "\nFigurine Type: " + type)
        # Create a folder for the requested figurine.
        tag = name.lower().replace(" ", "_")
        folder_path = "figurines/" + tag + "/"
        if not os.path.exists(self.root_folder + folder_path):
            os.makedirs(self.root_folder + folder_path)
            os.makedirs(self.root_folder + folder_path + "/images")
        # Restore the target figurine information for further operations.
        self.figurine_info = {
                                 "name": name,
                                 "description": description,
                                 "type": type,
                                 "tag": tag,
                                 "folder_path": folder_path,
                                 "status_json": self.status_json,
                                 "hermes_json": self.hermes_json
                             }
        # Get the figurine cataloging date in the required format.
        date = datetime.now().strftime("%m %d, %Y")
        # Produce the ongoing operation updates with the provided figurine information.
        self.figurine_op_status = {"operation": "ongoing", "cataloged": date,  "root_folder": self.root_folder,"figurine": self.figurine_info, "figurine_images": []}
        # Then, create a JSON file containing the provided figurine information and operation updates under the figurine folder.
        with open(self.root_folder + folder_path + self.figurine_info["status_json"], mode="w", encoding="utf-8") as file:
            json.dump(self.figurine_op_status, file, indent=4)
        # Also, create a JSON file for listings, will be updated later by the Hermes AI agent.
        with open(self.root_folder + folder_path + self.figurine_info["hermes_json"], mode="w", encoding="utf-8") as file:
            info = {"latest_check": None, "html_page": None, "ebay": {"avr": None, "links": None}, "amazon": {"avr": None, "links": None}}
            json.dump(info, file, indent=4)

        # Initiate the figurine cataloging operation on the rig by calling the borrowed function on the STM32 microcontroller.
        Bridge.call("handle_rig_operation_commands", "init")

        # Return the produced status updates as the response message to the API call.
        return self.figurine_op_status
⭐ In the rig_operation_completed function:
⭐ Once the cataloger rig (controlled by the STM32 MCU) concludes the mini-figurine cataloging procedure, update the associated JSON file accordingly.
⭐ Then, return the backend status updates to their default state while showing the latest cataloged figurine information.
    def rig_operation_completed(self):
        # Once the rig (STM32 MCU) completes the figurine cataloging operations, update the associated JSON file.
        self.figurine_op_status["operation"] = "completed"
        with open(self.root_folder + self.figurine_info["folder_path"] + self.figurine_info["status_json"], mode="w", encoding="utf-8") as file:
            json.dump(self.figurine_op_status, file, indent=4)
        # Then, return the cataloger status updates to its default state.
        cataloged = self.figurine_op_status["cataloged"]
        self.figurine_op_status = {"operation": "waiting", "this_session": {"latest_completed": self.figurine_info["tag"], "date": cataloged}}
        self.figurine_info = None
⭐ In the capture_and_save_img function:
⭐ Check if the restored mini-figurine information is available.
⭐ If so, wait for 2 seconds to give the Brio webcam time to adjust after positioning the rotary platform and the camera slider.
⭐ Create the image file name based on the current positioning conditions.
⭐ Initiate the OpenCV class instance with the necessary settings for the Logitech Brio 4K USB webcam.
⭐ While obtaining the latest generated frame (image) from the Brio webcam via the OpenCV module, discard the first 5 frames to avoid the buffer being filled with previous images.
⭐ Update the real-time status information for each image generation.
⭐ Release OpenCV camera resources.
⭐ Inform the STM32 MCU to resume the rig cataloging procedure.
    def capture_and_save_img(self, platform_position, slider_position):
        # Check the operation status.
        if self.figurine_info is not None:
            # First, wait for 2 seconds after new positioning configurations.
            sleep(2)
            # Create the image file name based on current positioning settings.
            file_name = "{}images/{}_camera_{}_platform_{}.jpg".format(self.figurine_info["folder_path"], self.figurine_info["tag"], slider_position, platform_position)
            # Initiate the OpenCV class instance with the necesary settings for the Logitech Brio 4K camera.
            brio = cv2.VideoCapture(2)
            brio.set(cv2.CAP_PROP_FOURCC, cv2.VideoWriter_fourcc(*'MJPG'))
            brio.set(cv2.CAP_PROP_FRAME_WIDTH, 1920)
            brio.set(cv2.CAP_PROP_FRAME_HEIGHT, 1080)
            # Obtain the latest generated frame (image) by the Logitech Brio USB camera via the OpenCV module.
            sleep(2)
            # Discard if buffer filled with previous images.
            for i in range(5):
                brio.read()
            success, latest_frame = brio.read()
            if(success):
                cv2.imwrite(self.root_folder + file_name, latest_frame)
                # Update the real-time status information for each new image.
                self.figurine_op_status["figurine_images"].append(file_name)
                print("\nImage captured: " + file_name)
            else:
                self.figurine_op_status["figurine_images"].append("Image capture error!")
                print("\nImage capture error!")
            # Release OpenCV camera resources.
            brio.release()
            sleep(5)
            # Inform the rig (STM32 MCU) to resume the cataloging procedure.
            self.figurine_image_captured = True;
⭐ In the produce_html_figurine_cards function:
⭐ Since this function runs once the associated exposed REST API endpoint is called, it serves to dynamically update the web interface via the Python backend.
⭐ Scan the cataloged mini-figurine folders.
⭐ Process each folder individually to obtain the JSON database files to produce HTML figurine cards, considering the stored figurine information and the market analysis provided by the Hermes AI agent. The market analysis includes eBay and Amazon listings and their average market prices.
⭐ Append each produced HTML card to the primary HTML content array.
⭐ If there are no figurines cataloged yet, generate the primary HTML content array accordingly.
⭐ Finally, return the primary HTML content array.
    def produce_html_figurine_cards(self):
        # Produce HTML figurine cards for each cataloged figurine, considering market analysis provided by the Hermes AI agent.
        html_content = {"html_content": "<li class='no-figurines-container'><h2 class='no-figurines-message'><span>⚠</span> There are no figurines cataloged yet!</h2></li>"}
        html_cards = []
        for status_json in glob.iglob(self.root_folder + "figurines/**/" + self.status_json, recursive=True):
            try:
                with open(status_json, mode="r", encoding="utf-8") as _status:
                    status = json.load(_status)
                    if(status["operation"] == "completed"):
                        # Obtain the associated figurine images.
                        figurine_images = ""
                        for i in range(len(status["figurine_images"])):
                            figurine_images += '<img src="{}" alt="{}_{}" class="slide" />'.format(status["figurine_images"][i], status["figurine"]["tag"], i+1)
                        # Obtain the figurine market analysis information and in-depth showcase HTML page produced by the Hermes AI agent.
                        hermes_html_page = ""
                        hermes_ebay_listings = ""
                        hermes_amazon_listings = ""
                        hermes_last_checked = "Work in progress..."
                        with open(status_json.replace(self.status_json, self.hermes_json), mode="r", encoding="utf-8") as _hermes:
                            hermes_info = json.load(_hermes)
                            # HTML showcase.
                            if hermes_info["html_page"] is not None:
                                hermes_html_page = '<button class="detail-trigger-btn" onclick="openIframeModal(\'🤖 Produced by Hermes AI Agent\', \'' + status["figurine"]["folder_path"] + 'hermes_pamphlet.html\')">Inspect Pamphlet by Hermes Agent</button>'
                            else:
                                hermes_html_page = '<button class="detail-trigger-btn" onclick="openIframeModal(\'Wikipedia\', \'https://en.wikipedia.org/wiki/Miniature_figure\')">Generic Pamphlet</button>'
                            # eBay listings.
                            if hermes_info["ebay"]["avr"] is not None:
                                avr = str(hermes_info["ebay"]["avr"]).replace("$", "")
                                hermes_ebay_listings = ('<li class="price-item"> <span class="platform-name">eBay Analysis</span> <span class="price-value">Avg: $' + avr + '</span>'
                                                        '<button class="shop-btn" onclick="openPriceModal(\'' + status["figurine"]["name"] + '\', \'eBay\', \'' + avr + '\','
                                                       )
                                hermes_ebay_listings += '['
                                for listing in hermes_info["ebay"]["links"]:
                                    hermes_ebay_listings += "'" + listing + "',"
                                hermes_ebay_listings.rstrip(',')
                                hermes_ebay_listings += '])">Show Listings</button></li>'
                            # Amazon listings.
                            if hermes_info["amazon"]["avr"] is not None:
                                avr = str(hermes_info["amazon"]["avr"]).replace("$", "")
                                hermes_amazon_listings = ('<li class="price-item"> <span class="platform-name">Amazon Analysis</span> <span class="price-value">Avg: $' + avr + '</span>'
                                                        '<button class="shop-btn" onclick="openPriceModal(\'' + status["figurine"]["name"] + '\', \'Amazon\', \'' + avr + '\','
                                                       )
                                hermes_amazon_listings += '['
                                for listing in hermes_info["amazon"]["links"]:
                                    hermes_amazon_listings += "'" + listing + "',"
                                hermes_amazon_listings.rstrip(',')
                                hermes_amazon_listings += '])">Show Listings</button></li>'
                            # Last analysis time.
                            if hermes_info["latest_check"] is not None:
                                hermes_last_checked = str(hermes_info["latest_check"])

                        # Create the HTML figurine  card of the target figurine according to the retrieved information.
                        html_card = ('<li class="figurine-item">'
                                        '<div class="slideshow-container">'
                                            + figurine_images +
                                            '<button class="prev" onclick="changeSlide(this, -1)">❮</button>'
                                            '<button class="next" onclick="changeSlide(this, 1)">❯</button>'
                                        '</div>'
                                        '<div class="figurine-info">'
                                            '<div class="figurine-header-group">'
                                                '<div class="figurine-name-wrapper">'
                                                    '<h2 class="figurine-name">' + status["figurine"]["name"] + '</h2>'
                                                    '<span class="figurine-type-badge">' + status["figurine"]["type"] + '</span>'
                                                '</div>'
                                                + hermes_html_page +
                                            '</div>'
                                            '<p class="figurine-description">' + status["figurine"]["description"] + '</p>'
                                            '<h3 class="price-section-title">Market Analysis by Hermes AI Agent</h3>'
                                            '<ul class="price-list"> ' + hermes_ebay_listings + hermes_amazon_listings + ' </ul>'
                                            '<div class="sync-timestamp-wrapper">'
                                                '<div class="sync-dot"></div>'
                                                '<span class="sync-text">Hermes Agent Market Sync: ' + hermes_last_checked + '</span>'
                                            '</div>'
                                        '</div>'
                                    '</li>')
                        # Append the generated HTML card to the main content array.
                        html_cards.append(html_card)
            except(FileNotFoundError):
                print("Server => File search error!")
        # Return the generated HTML content.
        if(len(html_cards) != 0):
            html_content = {"html_content": html_cards}
        return html_content
⭐ In the update_led_sequence_and_color function, based on the retrieved LED strip sequence and pixel color, transferred by the RGB color picker wheel on the web interface, update the LED strip accordingly by running the borrowed function on the STM32 MCU.
    def update_led_sequence_and_color(self, sid, data):
        # Based on the retrieved LED sequence and color (generated by the RGB wheel) information, update the LED strip accordingly.
        Bridge.call("update_led_sequence_by_interface", data["new_sequence"], data["r"], data["g"], data["b"])
        sleep(.5)
⭐ Declare the main Arduino App Lab application loop.
⭐ In the loop, notify the STM32 MCU by running the borrowed function once a new figurine image is captured successfully.
    def main_loop(self):
        while True:
            # Once a new figurine image captured successfully, notify the rig (STM32 MCU) accordingly.
            if self.figurine_image_captured:
                Bridge.call("handle_rig_operation_commands", "img_captured")
                self.figurine_image_captured = False
            sleep(1)
⭐ In the inform_figurine_fall function, inform the STM32 MCU by running the borrowed function once the provided Edge Impulse audio classification model detects a figurine fall.
#️⃣ I excluded this function from the class since the proprietary self parameter prevents it from being executed as a callback function by the Audio Classification Brick.
def inform_figurine_fall():
    print("\n\nEI audio classification model => Figurine fall detected!\n\n")
    Bridge.call("handle_rig_operation_commands", "fall_detected")
⭐ Define the figurine_cataloger_backend class object.
⭐ Initiate the mini-figurine cataloger App Lab application (backend) with the implemented Bricks.
figurine_cataloger_backend_obj = figurine_cataloger_backend(False, 0.99)

# Initiate the main Arduino App application loop with the provided function, including the added Bricks.
App.run(user_loop=figurine_cataloger_backend_obj.main_loop)


Step 5: Developing a feature-rich web interface hosted directly by the Arduino App Lab
As mentioned earlier, the built-in WebUI Brick handles hosting of the mini-figurine cataloger web interface. Thus, I was able to program the web interface directly on the Arduino App Lab.
For the interface frontend, including the RGB color picker wheel, I employed Google Gemini for easy mockup and developed the features I envisioned on top of the Gemini mockup. It helped quite a bit to shorten my development process since I do not enjoy frontend development :)
Please refer to the project GitHub repository to inspect all code files.
📁 socket.io.min.js
#️⃣ This script includes the necessary functions to communicate with the Python backend via WebSocket.

📁 index.js
⭐ To acquire the HTML content generated dynamically by the Python backend to showcase the latest mini-figurine catalog, every 2 seconds, make an HTTP GET request to the associated exposed REST API endpoint.
setInterval(() => {
	$.ajax({
		url: "produce_html_figurine_cards",
		type: "GET",
		success: (response) => {
				// Process the obtained information.
                let figurine_item_container = $('.figurine-list');
                figurine_item_container.html(response["html_content"]);
			}
		});
}, 2000);
⭐ Once the user enters the required figurine information on the form and requests to initiate the mini-figurine cataloging procedure, make an HTTP GET request to the associated REST API endpoint exposed by the Python backend.
initiate_cataloging?name={}&description={}&type={}
⭐ Process the obtained operation status information and notify the user on the web interface via a native confirmation box.
⭐ Enable the confirmation box to open the RGB color picker wheel on a new tab to let the user adjust the WS2813 RGB LED strip sequence and pixel color.
$("#submit_button").on("click", function(){
  // Obtain given figurine information.
  let fig_name = $("#fig_name").val();
  let fig_description = $("#fig_description").val();
  let fig_type = $("#fig_type").val();
  if(fig_name != "" && fig_description != "" && fig_type != ""){
    // Call the associated application REST API endpoint.
	$.ajax({
		url: "initiate_cataloging?name=" + fig_name + "&description=" + fig_description + "&type=" + fig_type,
		type: "GET",
		success: (response) => {
				// Process the obtained information.
                if(response["operation"] == "ongoing"){
                  let message = "🤖 Mini-figurine cataloging procedure is initiated!\n\n✅ Folder: " + response["figurine"]["folder_path"]
                                + "\n✅ Name: " + response["figurine"]["name"]
                                + "\n✅ Description: " + response["figurine"]["description"]
                                + "\n✅ Type: " + response["figurine"]["type"]
                                + "\n✅ Status: " + response["figurine"]["status_json"]
                                + "\n\nDo you want to adjust WS2813 RGB LED strip sequence and pixel color?";
                  // Show the confirmation with the given figurine information to enable the user adjust the WS2813 RGB LED strip.
                  if(confirm(message)){
                    window.open("/led_sequence.html", "_blank");
                  }
                  // After showing the confirmation message, clear form values.
                  $("#fig_name").val(""); $("#fig_description").val(""); $("#fig_type").val("");
                }else{
                  alert("❌ Server error! Cannot initiate the rig cataloging operations.");
                }
			}
		});
  }else{
    alert("📝 Please fill all required areas!");
  }

});

📁 led_sequence.js
⭐ Initiate the built-in WebSocket instance to communicate with the mini-figurine cataloger application backend (Python).
const socket = io(`http://${window.location.host}`);
⭐ Draw the RGB color picker wheel on the given HTML canvas element and enable the user to select a color on the wheel or enter one manually.
⭐ Once the user requests, transfer the selected LED strip sequence (by angle) and the selected RGB (pixel) color information to the Python backend via WebSocket.
...

function submitPayload() {
    const sequence_data = {
        new_sequence: parseInt(sequenceSelect.value, 10),
        r: parseInt(redInput.value, 10),
        g: parseInt(greenInput.value, 10),
        b: parseInt(blueInput.value, 10)
    };

    outputToast.style.display = "block";
    outputToast.textContent = `>> Payload Sent: ${JSON.stringify(sequence_data)}`;

    // Transfer the user-selected LED sequence (by angle) and pixel color information to the backend via WebSocket.
    socket.emit("update_led_sequence_and_color", sequence_data);

}

...

📁 index.css
#️⃣ Please refer to the project GitHub repository to review the cataloger web interface CSS (styling) file.

📁 index.html
#️⃣ This file contains the latest mini-figurine catalog, which gets updated dynamically by the Python backend, considering the latest market analysis conducted by the Hermes AI agent, and the figurine information form to start the cataloging procedure for a new figurine.
#️⃣ Please refer to the project GitHub repository to review.


📁 led_sequence.html
#️⃣ This file contains the RGB color picker wheel and LED strip sequence options by angle.
#️⃣ Please refer to the project GitHub repository to review.


Step 5.1: Ensuring the exported App Lab application operates as anticipated
#️⃣ I edited the app.yaml file via the GNU nano text editor to add a description and change the application icon (emoji).


After revising the app.yaml file, I exported my mini-figurine cataloger App Lab application as a ZIP folder. Then, I imported the ZIP folder into the App Lab to see whether the application was ready for sharing publicly.
#️⃣ Please refer to the project GitHub repository to download the application's ZIP folder.
#️⃣ To import the mini-figurine cataloger App Lab application, navigate to Create new app + ➡ Import App and select the downloaded ZIP folder.


#️⃣ Once you import the mini-figurine cataloger App Lab application, it comes with the default configurations for the Audio Classification Brick (glass-breaking). Thus, as explained in previous steps, please make sure to link your Arduino account to Edge Impulse Studio to employ my publicly available Edge Impulse audio classification model for detecting figurine falls.

Step 6: Installing the Hermes AI agent on UNO Q
#️⃣ Since the Arduino UNO Q splits storage into a limited root partition and a larger user partition (/home/arduino), installing the Hermes AI agent via the usual method directly to the root might induce storage issues in the long run.
#️⃣ Thus, I redirected the temporary directories, cache, and application storage to the user partition before executing the installer.
#️⃣ I configured the environment variables to make sure the Hermes agent and its package manager (uv) would be installed and built entirely within the user partition (/home/arduino).
#️⃣ Then, I restarted the shell profile on the terminal provided by the Arduino App Lab.
# Create the necessary directories in user-space
mkdir -p /home/arduino/.local/bin
mkdir -p /home/arduino/.local/share/uv
mkdir -p /home/arduino/.local/cache/uv
mkdir -p /home/arduino/.local/python
mkdir -p /home/arduino/.hermes

# Append environment variables to .bashrc
cat >> ~/.bashrc << 'EOF'
# Hermes Agent on Arduino Uno Q — redirect large dirs to /home/arduino
export HERMES_HOME="/home/arduino/.hermes"
export UV_HOME="/home/arduino/.local"
export UV_CACHE_DIR="/home/arduino/.local/cache/uv"
export UV_TOOL_DIR="/home/arduino/.local/bin"
export UV_PYTHON_INSTALL_DIR="/home/arduino/.local/python"

# Ensure user-space binaries are on your PATH
export PATH="/home/arduino/.local/bin:$PATH"
EOF

# Reload your shell profile
source ~/.bashrc

#️⃣ After making the required configurations, I navigated to the user partition and installed the Node.js tarball archive file. Then, I extracted the Node packages into the user partition to avoid a system-wide installation.
cd /home/arduino
# Download the ARM64 Node.js v22 LTS tarball
curl -fsSL https://nodejs.org/dist/v22.22.2/node-v22.22.2-linux-arm64.tar.xz -o node.tar.xz

# Extract it right into your user-space local folder
tar -xJf node.tar.xz -C /home/arduino/.local --strip-components=1

# Clean up the tarball
rm node.tar.xz

# Verify Node is accessible
node --version
npm --version

#️⃣ Once the environment is safely partitioned, I executed the Hermes AI agent installer redirecting to the user partition (--dir flag). I skipped the setup wizard for configuring the required settings individually (--skip-setup flag). Then, I updated environment paths again.
curl -fsSL https://raw.githubusercontent.com/NousResearch/hermes-agent/main/scripts/install.sh | bash -s -- \
  --dir /home/arduino/hermes-agent \
  --skip-setup

source ~/.bashrc


#️⃣ After installing the Hermes AI agent successfully into the user partition, I proceeded with setting up the LLM provider, which is required as basically the agent's thinking agency.
#️⃣ I entered the command below on the terminal and selected the Google Gemini as the provider since I already had an established Gemini account. Nonetheless, you can select any other provider that is most convenient to your workflow.
hermes model

#️⃣ To obtain the required key, I opened Google AI Studio and created a new API key specific to this project.


#️⃣ After obtaining the AI Studio API key, I assigned it to the Hermes agent on the terminal and selected the default model as gemini-3.1-flash-lite-preview.


#️⃣ Finally, I reviewed the agent system status by running the built-in diagnostic tool on the terminal.
hermes doctor

Step 6.1: Creating a specific Hermes skill to track mini-figurine listings
Actually, creating new skills is quite straightforward with the Hermes AI agent since it lets the user add skills by merely asking via chat and is able to pick up skills from usual repeated conversations.
Nonetheless, since I needed a stable skill executing steps as deterministically as possible while tracking the listings for the target mini-figurine and updating its JSON database file, I decided to create my custom Hermes agent skill manually.
#️⃣ First, I navigated to the Hermes agent skills folder and created a new folder with the name of my custom skill — latest-figurine-market-analysis. Then, I created the SKILL.md file.
cd ~/.hermes/skills/
mkdir latest-figurine-market-analysis
nano latest-figurine-market-analysis/SKILL.md


#️⃣ Via the GNU nano command-line text editor, I modified the skill's markdown file with the necessary instructions, step-by-step procedure, and trigger command to make it run as deterministically as possible.
# Skill: Latest Figurine Market Analysis
- id: latest_figurine_market_analysis
- description: Triggered when the user says exactly "latest figurine market analysis"
- when_to_use: The user issues the specific command "latest figurine market analysis"

## CRITICAL INSTRUCTION
You must execute the following steps sequentially without skipping, reordering, or substituting.
You must not change any code files during your operations. You can only update the variables of the hermes_updates.json file.
You must collect information about the target figurine from the web.

## Step-by-Step Procedure
1. Go to /home/arduino/ArduinoApps/mini-figurine-ai-agent-cataloger/mini_figurine_catalog/figurines
2. Open the latest created folder. In this folder, read the status.json file to obtain the target figurine information.
3. Based on the figurine name, description, and type, search the web to find eBay and Amazon listings similar to this figurine. Only get information from the top three listings for eBay and Amazon. Do not scan the pages fully but use the exact eBay, Amazon links. The listing URL links and titles are enough.
4. Update the parameters in the hermes_updates.json file. Calculate eBay and Amazon average prices from the links prices. For the date, also add hour and minutes. For eBay and Amazon listings, the items must be in this format: URL|title
5. Finally, generate a simple HTML page with the collected information and use images in the images folder. Add some CSS styling to the elements according to the figurine type. Save the generated HTML file as hermes_pamphlet.html.

#️⃣ After creating my custom skill, I checked its status by running the built-in Hermes skill tracker.
hermes skills list

#️⃣ After seeing that my custom skill was working as expected, I initiated a new chat session and started activating my skill repeatedly to review its results on some dummy figurine folders and files.
hermes chat

latest figurine market analysis


#️⃣ I noticed some missteps while calculating average market prices and faulty JSON variable names for consecutive skill executions. Thus, I directly asked the Hermes agent to modify the skill to rectify these issues. Then, the agent revised the skill's markdown file accordingly, and I did not encounter any errors afterward.
#️⃣ It even created an additional markdown file to better grasp my JSON database file structure to avoid variable errors.
---
name: latest-figurine-market-analysis
id: latest_figurine_market_analysis
description: Triggered when the user says exactly "latest figurine market analysis"
when_to_use: The user issues the specific command "latest figurine market analysis"
---

# Skill: Latest Figurine Market Analysis

## CRITICAL INSTRUCTION
You must execute the following steps sequentially without skipping, reordering, or substituting.
You must not change any code files during your operations. You can only update the variables of the hermes_updates.json file.
You must collect information about the target figurine from the web.

## Step-by-Step Procedure
1. Go to /home/arduino/ArduinoApps/mini-figurine-ai-agent-cataloger/mini_figurine_catalog/figurines
2. Open the latest created folder. In this folder, read the status.json file to obtain the target figurine information.
3. Based on the figurine name, description, and type, search the web to find eBay and Amazon listings similar to this figurine. Only get information from the top three listings for eBay and Amazon. Do not scan the pages fully but use the exact eBay, Amazon links. The listing URL>
- **JSON Update:** When updating `hermes_updates.json`, preserve the existing keys (`latest_check`, `html_page`, `ebay`, `amazon`) exactly as they appear. Only modify the values.
- **HTML Formatting:** Generate the `hermes_pamphlet.html` using the figurine's specific type for styling, and ensure relative image paths are used (e.g., `images/<filename>.jpg`).

## Pitfalls & Troubleshooting
- If web search tools (curl/grep) fail due to bot detection, use specific user agents or fallback to direct search engine URL constructions if possible, but prioritize reporting the restriction over repeatedly failing queries.
- **Price Calculation:** When calculating averages for `hermes_updates.json`, ensure you extract the numeric value only, stripping currency symbols. If multiple items are in a listing (like a 3-pack), treat the total price as one entry unless otherwise specified.
- When generating the `hermes_pamphlet.html`, ensure the image paths use relative references from the figurine directory (e.g., `images/file.jpg`) rather than absolute file system paths, to ensure portability.
- Ensure the figurine folder structure is consistent before attempting updates.
- If data files (like hermes_updates.json) are missing or inaccessible, verify the absolute path before attempting edits.

## References
- `references/figurine_data_structure.md` — Explains the expected status.json and hermes_updates.json structure, and the absolute paths for the cataloger.


#️⃣ Finally, after executing the revised skill, the Hermes AI agent was able to find the latest cataloged mini-figurine, read its information from the associated JSON database file (status.json), search for exact or adjacent collectible listings on eBay and Amazon, update the associated JSON database file (hermes_updates.json) with the web-scraped listing information, including the estimated average market prices, and generate a detailed pamphlet as an HTML file (hermes_pamphlet.html) for the given figurine, including the captured figurine images by the mini-figurine cataloger rig.


Step 6.2: Setting up Firecrawl to solve web scraping issues
Although my Hermes skill was performing great, there was still a critical issue with finding eBay and Amazon listings. Even though the Hermes agent was able to find superficial product information online via built-in browser tools, it could not scrape eBay and Amazon to find accurate listings due to bot protection, leading to hallucinated listing links, titles, and prices.

To solve this issue, I enabled the Hermes agent to employ Firecrawl to bypass these restrictions and obtain the required information.
#️⃣ First, I created a Firecrawl account and obtained a free trial API key, which lets the agent scrape 1,000 pages every month and is more than enough for this use case.

#️⃣ After obtaining the Firecrawl API key, I opened the built-in Hermes tool configuration wizard on the terminal and activated the Firecrawl integration.
hermes setup tools


Step 7: Modeling the mini-figurine cataloger rig 3D components
As mentioned earlier, I wanted to build a compact mini-figurine cataloger rig that can adjust the rotary platform angle and the camera slider position automatically, enabling the cataloger App Lab application to capture 360° images of the target figurine at different camera distances. To control the rotary platform movement without increasing the rig footprint, I designed a unique worm gear and wheel mechanism driven by a micro metal gearmotor. To move the camera slider, I modified an existing GT2 20T pulley design to make it compatible with the micro metal gearmotor, enabling the gearmotor to drive the slider via a GT2 timing belt. As discussed, I also designed a stand containing the WS2813 RGB LED strip, helping set up a scenery for different figurine categories and aesthetics.
As a frame of reference for those who aim to replicate or improve this cataloger rig, I shared the design files (STL) of all 3D components as open-source on the project GitHub repository.
🎨 I sliced all the exported STL files in Bambu Studio and printed them using my Bambu Lab A1 Combo. Since I decided to utilize TCRT5000 infrared sensors to determine the platform angle and the slider position, the color theme of the associated parts must be black and white. Thus, I utilized these PLA filaments while printing 3D parts of the cataloger rig:
- eSun eStars-PLA Galaxy Black
- eSun ePLA-Matte Deep Black
- eSun ePLA-Matte Milky White
- eSun ePLA-HS Grey
To apply more contrast between the worm wheel and its angle points, I utilized matte black and white filaments. Nevertheless, for the remaining main rig parts, I utilized the galaxy black variation, which is a fluorescent-induced filament and looks incredible under UV lighting. I thought it would be a good choice for low-light photography in accordance with the theme, such as Batman 1989.
As I was modeling the mini-figurine cataloger rig components, I leveraged these open-source CAD files to obtain accurate measurements and create new parts by modification:
- ✒️ Arduino UNO Q (Step) | Inspect
- ✒️ Pololu Micro Metal Gearmotor [LP, MP, and HP] (Step) | Inspect
- ✒️ GT2 - 20T Pulley (Step) | Inspect
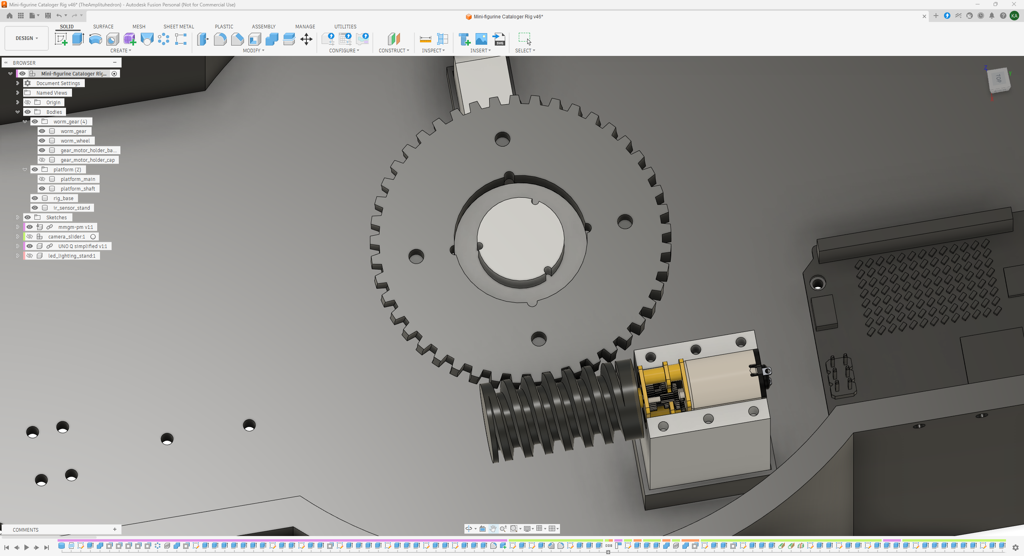
The pictures below show the final version of the mini-figurine cataloger rig on Fusion 360. I also added the first version of the printed parts. As I was assembling the rig, I modified some of the parts due to clearance issues. I will thoroughly explain all of my design choices and the assembly process in the following steps.


Step 7.a.1: Designing the rig base consisting of a rotary platform driven by a worm gear-wheel mechanism and a WS2813 LED strip stand
#️⃣ First, I modeled the worm gear via the built-in Thread plugin by selecting the trapezoidal thread for 16 mm height and 4 mm pitch (TR16x4).
#️⃣ Then, via intersecting the worm gear, I extrapolated the features required to create the worm wheel. I used the usual gear diameter formula to calculate the worm wheel diameter based on the number of teeth I required:
D = (Pitch * number_of_teeth) / π
Pitch = 4 mm
number_of_teeth = 45
#️⃣ After completing the worm gear-wheel mechanism, I designed the cataloger rig base around it, which is compatible with the Arduino UNO Q.
#️⃣ I specifically separated all of the rig base components and made them attachable via M2 screws, such as the platform shaft, gearmotor cases, and the unique TCRT5000 infrared sensor mounts, preventing complex support requirements. In this regard, I was able to overhaul and replace modified components effortlessly to solve clearance issues as I was assembling the cataloger rig.
#️⃣ As I wanted to enable the WS2813 RGB LED strip to show angle-based sequences, I decided to design a circular mount with gaps per pixel (LED). Nonetheless, since the strip has a length of 1 meter (1000 mm), it was not possible to print the circular mount as a single component, considering the total circumference of the 1000 mm strip length and the additional padding required for cable management.
Circumference = 2 x π x r
#️⃣ Thus, I designed the circular strip mount as four parts, fastenable via M2 screws through the strengthening support pins.
#️⃣ The circular mount connects to the LED strip stand, which is compatible with the Grove electromagnet, directly via M2 screws.


Step 7.a.2: Printing and assembling the rig base
#️⃣ I sliced the rig base with 10% sparse infill density and left the other settings at default.


#️⃣ I sliced the circular LED strip mount parts with critical tree supports only. For the strengthening support pins, I increased the wall loop (perimeter) number to 3.


#️⃣ I sliced the LED strip stand with critical tree supports and 10% sparse infill density. For the rotary platform base, I applied the same density but left the other settings at default.


#️⃣ I sliced the worm wheel by increasing the wall loop (perimeter) number to 4 so as to make it sturdier against the applied torque and stress. I also utilized the built-in painting tool to highlight the angle points with white on the black body. As mentioned earlier, the black and white contrast is required to enable the infrared sensor to detect angle points.
#️⃣ Again, considering the applied torque and stress, I also increased the wall loop (perimeter) number to 4 for the worm gear.


#️⃣ After printing the components, I started to assemble the mini-figurine cataloger rig.
#️⃣ First, I assembled the four parts of the circular LED strip mount via M2 screws and nuts through the strengthening support pins.
#️⃣ Then, I connected the circular LED strip mount to the LED strip stand via M2 screws.


#️⃣ I attached the Arduino UNO Q to its dedicated spot via M2 screws, providing space for the bottom expansion headers (JMEDIA and JMISC).
#️⃣ I also fastened two mini breadboards right next to the UNO Q to make electrical component connections.


#️⃣ I connected the LED strip stand to the rig base via M2 screws. Then, I connected the separated rig base components, including the front stand of the camera slider, via M2 screws through the bottom of the rig base.
#️⃣ Since I sliced the separated rig base components, including the platform shaft and the custom GT2 20T pulley, with the camera slider parts, please refer to the following steps to review their slicer settings.


#️⃣ Before attaching the platform shaft, I assembled the worm wheel, pivoted via a 17mm ID groove ball bearing. Since I designed the worm wheel and the platform shaft with features to let the plastic expand to establish a press (friction) fit connection between them through the groove ball bearing, the wheel rotates smoothly on the shaft, facing the white angle points at the bottom.
#️⃣ I also attached the four 3 cm M3 hex standoffs, carrying the platform base, to the worm wheel.
#️⃣ Then, I attached the platform shaft to the rig base via M2 screws.


#️⃣ I established the electrical component connections on the UNO Q and attached them to their dedicated slots and holders on the rig base and the LED strip stand.
#️⃣ I placed the gearmotors directly into their holders, providing loose friction fit connections. I positioned the Grove WS2813 LED strip directly into the circular mount, providing windows (gaps) for each pixel (LED).


#️⃣ Then, I attached the worm gear to the Pololu 100:1 micro metal gearmotor. I specifically designed the worm gear to snap fit to the gearmotor shaft.
#️⃣ After testing the worm gear-wheel mechanism, I secured the 100:1 micro metal gearmotor by closing the motor holder cap via M2 screws.


Step 7.b.1: Designing the camera slider based on a GT2 belt-driven mechanism
#️⃣ I designed the camera slider mechanism to be driven by a single GT2 timing belt and balanced by two rods and two supports fixed to the rig base.
#️⃣ Instead of designing cylindrical supports, I gave them flat bases to make them print-friendly.
#️⃣ Since the commercial GT2 20T pulleys were not compatible with the Pololu 298:1 micro metal gearmotor shaft, I modified an existing GT2 20T pulley STEP file to create a custom priantable pulley.
#️⃣ I designed the front and back stands of the slider to ensure that my custom GT2 20T pulley and the GT2 16T idler pulley with bearing (3mm bore) are aligned perfectly to drive the GT2 timing belt attached to the camera holder. I modeled the back stand to have an M3 screw pass through in order to secure the idler pulley.
#️⃣ I designed the camera holder considering the measurements of the Logitech Brio 4K USB webcam's clip.
#️⃣ I also added slots to pass the two ends of the GT2 timing belt through the camera holder, which can be secured via an aluminium GT2 belt fixing piece (clamp). Furthermore, I designed three printable belt fasteners in the case of installing the timing belt without the aluminium clamp.
#️⃣ The slider supports, connecting the back stand, the front stand, and the rig base via M2 screws to establish a sturdy slider footing, has highlights for calibrating the camera distances — 5 cm, 10 cm, and 15 cm. The camera holder has indicators to align the mentioned highlights while marking the timing belt for calibration.


Step 7.b.2: Printing and assembling the camera slider
#️⃣ I sliced the camera slider rods and supports with 10% sparse infill density. Via the built-in painting tool, I emphasized the camera distance calibration highlights on the supports with white.


#️⃣ Since I decided to utilize the high-tolerance grey PLA filament for these parts, I sliced the camera stands, the custom GT2 20T pulley, and the separated rig components together. I increased the wall loop (perimeter) number to 4 for the custom GT2 pulley and to 3 for the second TCRT5000 infrared sensor mount.
#️⃣ Via the built-in painting tool, I emphasized the camera distance calibration indicators on the camera holder with white.


#️⃣ First, I attached my custom GT2 20T pulley to the Pololu 298:1 micro metal gearmotor shaft, which has a friction fit connection.


#️⃣ Before assembling the camera slider, according to my initial feature diagnosis, I noticed that the first TCRT5000 infrared sensor was too close to the worm wheel to distinguish its black body from the white angle points. Thus, I modified the first infrared sensor mount.

#️⃣ Then, I secured the 298:1 micro metal gearmotor by closing the motor holder cap via M2 screws.
#️⃣ After completing the rig base component connections, I started to assemble the camera slider.
#️⃣ First, I passed the two rods through the Brio camera holder.


#️⃣ Then, I attached the rods to the front and back slider stands and fastened them via M2 screws.


#️⃣ I attached the GT2 16T idler pulley to the back stand by passing an M3 screw through its bearing with a 3 mm bore.


#️⃣ Then, I installed the GT2 timing belt between the custom GT2 20T pulley and the GT2 16T idler pulley. I passed the two ends of the timing belt through the dedicated slots on the camera holder and secured them via the aluminium GT2 belt fixing piece (clamp).


#️⃣ After installing the timing belt, I combined the slider supports with the back stand, the front stand, and the rig base via M2 screws, which balances the camera holder jerk while being driven by the gearmotor.

#️⃣ Before closing the platform base, I tested the rotary platform and the camera slider movements manually via the analog joystick. I also ensured that the first TCRT5000 infrared sensor could detect the white angle points on the bottom of the worm wheel while rotating at full speed.


#️⃣ As discussed, I wanted to utilize the second TCRT5000 infrared sensor to determine the camera distance by detecting white markers on the GT2 timing belt.
#️⃣ To calibrate the required markers, I aligned the calibration highlights on the slider supports and the calibration indicators on the camera holder. Once they are aligned, I draw lines on the belt corresponding to the position right under the second infrared sensor. Then, I utilized white electrical tape to create white markers on the drawn lines.


#️⃣ After calibrating, I ensured that the second TCRT5000 infrared sensor could detect the white distance markers fastened to the timing belt while moving at full speed.
#️⃣ After concluding testing, I attached the platform base to the rig base via M3 screws through the four 3 cm M3 hex standoffs connected to the top of the worm wheel.


#️⃣ Finally, I attached the Logitech Brio 4K webcam to the camera holder via a zip tie and connected it to the UNO Q via the UGREEN 5-in-1 USB hub (dongle).


Step 7.c: Designing and printing custom background magnetic ornaments
#️⃣ As mentioned earlier, I decided to create unique background icons depending on the target figurine's category, brand, theme, and production line while capturing its pictures on the mini-figurine cataloger rig.
#️⃣ To effortlessly attach and replace these background icons, I decided to design them as magnetic ornaments, having rectangular neodymium magnets (W: 5 mm x H: 10 mm x D: 2 mm) at the center.
#️⃣ According to my most common mini-figurine categories, including McDonald's Happy Meal, I selected applicable black and white logos and turned them into printable objects (magnetic ornaments) in Fusion 360. I specifically designed the ornaments protruding each color layer by layer, which reduces the total print time and the discarded filament amount considerably. I also added features to expand the plastic so as to affix the rectangular neodymium magnets via a press (friction) fit connection.


#️⃣ Then, I sliced all ornaments to print them in accordance with their color themes via the built-in painting tool.


#️⃣ After printing all ornaments and fastening their neodymium magnets at the center, I was able to effortlessly attach them to the electromagnet on the LED strip stand as background logos while photographing mini-figurines.
Outcome: Cataloging mini-figurines automatically and the Hermes AI agent-assisted market analysis (eBay and Amazon)
🦖🔍⚙️📸 The mini-figurine cataloger rig allows the user to control the rotary platform and the camera slider movements manually via the analog joystick.
- Joystick X-axis [Right] ➡ Platform [Rotate Right]
- Joystick X-axis [Left] ➡ Platform [Rotate Left]
- Joystick Y-axis [Up] ➡ Slider [Move Front]
- Joystick Y-axis [Down] ➡ Slider [Move Back]
🦖🔍⚙️📸 Once the joystick button is pressed, the user can halt all ongoing movement, activate the electromagnet, which strengthens the magnetic ornament attachment, and confirm that the target mini-figurine position is corrected after fall detection, which is determined by the Edge Impulse audio classification model.
🦖🔍⚙️📸 Via the electromagnet, the user can attach various magnetic ornaments as background icons while capturing mini-figurine images, specifically designed for the target figurine's brand, category, theme, or production line, such as Spider-Man.


🦖🔍⚙️📸 The mini-figurine cataloger web interface updates automatically by making an HTTP GET request to the associated REST API endpoint provided by the Python backend to display the latest mini-figurine catalog and market analysis conducted by the Hermes AI agent.
🦖🔍⚙️📸 In this process, it also informs the user if there are no cataloged mini-figurines yet.
🦖🔍⚙️📸 The cataloger web interface enables the user to initiate the figurine cataloging procedure by entering the essential figurine information on the provided form.
🦖🔍⚙️📸 Once the Python backend processes the given figurine information and handles the necessary backend operations to proceed with the cataloger rig operations, the web interface informs the user of the operation status and gives the option to open the interface's LED strip parameter adjustment section.


🦖🔍⚙️📸 As the web interface shows the prompt to open the LED strip adjustment page, the Python backend initiates the cataloger rig operations performed by the STM32 MCU.
🦖🔍⚙️📸 If the user chooses to open the adjustment page, the web interface brings the RGB color picker wheel and lets the user update the LED strip sequence by angles and the pixel (LED) color remotely. Considering the LED strip is placed in a circular mount and has 60 LEDs (pixels), I programmed each 90° range as 15 LEDs.
- Angle: 0°
- Angle: 90°
- Angle: 180°
- Angle: 270°
- Angle: 0° - 180°
- Angle: 90° - 270°
- Angle: 360°
- OFF
🦖🔍⚙️📸 The cataloger rig also enables the user to adjust these parameters, predefined pixel colors, via the control buttons. Since the sketch restores the latest transferred RGB color from the interface, the user can select this color later manually.
🦖🔍⚙️📸 Once the control button B is pressed, the cataloger rig shows the successive pixel color in the predefined RGB color array, returning the first when exhausted. Also, this button deactivates the electromagnet if the user does not want to secure magnetic ornaments.
- Control button [A] ➡ Next sequence
- Control button [B] ➡ Change pixel color
- Control button [C] ➡ Previous sequence


🦖🔍⚙️📸 As discussed, I printed some of the cataloger rig parts with a fluorescent-induced black filament to create a unique scenery for low-light photography applicable to some figurine categories, such as Batman 1989.
🦖🔍⚙️📸 As explained, regardless of the LED strip adjustments, the cataloger rig initiates performing the automatic mini-figurine cataloging procedure immediately once the Python backend processes the given figurine information.
🦖🔍⚙️📸 First, the cataloger rig homes the camera holder of the camera slider via the micro switch.


🦖🔍⚙️📸 Then, the cataloger rig moves the holder to the first slider position (5 cm) to distance the Logitech Brio 4K webcam from the target figurine. The rig determines the distance by detecting white markers on the GT2 timing belt via the second TCRT5000 infrared sensor.

🦖🔍⚙️📸 After finding the first camera slider position, the cataloger rig swivels the rotary platform to the successive platform angle — 0°, 90°, 180°, or 270°.
🦖🔍⚙️📸 Once the rig finds the next platform angle by detecting white angle points on the worm wheel via the first TCRT5000 infrared sensor, the Python backend captures a picture of the target mini-figurine.
🦖🔍⚙️📸 Until all three camera slider positions — 5 cm, 10 cm, and 15 cm — and all four platform angles for each distance are exhausted, the cataloger rig continues the cataloging operations to capture figurine pictures at all positioning combinations. Images are named according to the figurine information and camera distances with platform angles.
- spider-man_funko_camera_1_platform_1.jpg
- spider-man_funko_camera_3_platform_4.jpg


🦖🔍⚙️📸 While performing the figurine cataloging procedure, if the target figurine falls as the rotary platform swivels, the Python backend is able to detect the figurine fall via the provided Edge Impulse audio classification model. Once a figurine fall is detected, the backend suspends all ongoing operations and waits for confirmation that the target figurine is positioned correctly after the fall. As mentioned, the user can confirm the correction by pressing the analog joystick switch.

🦖🔍⚙️📸 After all mini-figurine images are captured, the Python backend generates the target figurine's HTML card, and the web interface shows it dynamically, including all 12 images as a slideshow.


🦖🔍⚙️📸 As discussed, the Python backend generates the application database as JSON files under each mini-figurine folder, which enables the Hermes AI agent to interpret the given figurine information and update web-scraped market analysis information precisely.
- status.json
- hermes_updates.json


🦖🔍⚙️📸 While conducting the market analysis, the Hermes agent also produces a detailed figurine pamphlet in the form of an HTML page, showing the figurine information and web-scraped listings.
🦖🔍⚙️📸 Before the pamphlet generation, the HTML cards redirect to the Wikipedia figurine history page as the generic pamphlet.

🦖🔍⚙️📸 As discussed, I created a special market analysis skill for the Hermes AI agent to enable it to obtain eBay and Amazon listings of the target mini-figurine and the adjacent collectibles as deterministically as possible.
🦖🔍⚙️📸 To run the market analysis skill, initiate a new Hermes agent chat session on the terminal and enter the associated skill trigger:
latest figurine market analysis

🦖🔍⚙️📸 Executing this skill, the Hermes agent scrapes listing information via Firecrawl, estimates average market prices, updates the associated JSON database file accordingly, and produces the figurine pamphlet (HTML page).


🦖🔍⚙️📸 As the Python backend updates the mini-figurine HTML cards dynamically, the web interface shows the market analysis results by the Hermes AI agent immediately, with the latest market synchronization date.
🦖🔍⚙️📸 Then, the web interface lets the user review the web-scraped eBay and Amazon listings and the generated figurine pamphlet.


🦖🔍⚙️📸 For debugging, the built-in App Lab sketch serial monitor and Python shell print progression updates.


🦖🔍⚙️📸 To catalog the next mini-figurine, just repeat all of the mentioned features diligently.


Scheduling a cron job for tracking listings and further improvements
#️⃣ Of course, it would not be feasible to run the market analysis skill for every cataloged mini-figurine manually to track the latest eBay and Amazon listings. Thus, I created a cron job to execute the market analysis skill for each cataloged figurine for every day at 8 AM and 8 PM.
#️⃣ Fortunately, setting cron jobs with the Hermes AI agent is as simple as asking via chat.
i want you to run latest figurine market analysis skill on every folder to update all figurine information, not only the latest one, everyday at 8 AM and 8 PM

────────────────────────────────────────
  ┊ ⏰ preparing cronjob…
  ┊ ⏰ cron      create daily-figurine-market-analysis-update  0.0s

╭─ ⚕ Hermes ───────────────────────────────────────────────────────────────────────────────────────────────────────────────────────────────────────────────────────────────────────────────────────────────────────────────────────────────────────────────────────────────────────────╮
    I have successfully scheduled a cron job to run the figurine market analysis on all folders in your catalog twice daily at 8:00 AM and 8:00 PM.

    Job Details:
    - Job Name: daily-figurine-market-analysis-update
    - Job ID: dc4ae1b8a71b
    - Schedule: 0 8,20 * * *
    - Action: The agent will iterate through all subdirectories in /home/arduino/ArduinoApps/mini-figurine-ai-agent-cataloger/mini_figurine_catalog/figurines/, update the hermes_updates.json (preserving original variable names), and regenerate the hermes_pamphlet.html file for each.

#️⃣ After setting up the cron job, I made sure it is running in the background via the built-in agent tool.
hermes cron list

#️⃣ Once I saw that the market analysis cron job was active, I ran the analysis cron job manually via the built-in agent tool by utilizing its job ID to review the automatically tracked eBay and Amazon listings for each cataloged mini-figurine.
hermes cron run <job-id>

#️⃣ If you do not prefer interacting with the Hermes AI agent on the terminal, you can set up the built-in integration tools so as to chat with the agent via your favorite messaging platform, such as Telegram or Discord.
Project GitHub Repository
The project's GitHub repository provides:
- Code files
- The mini-figurine cataloger App Lab application's ZIP folder
- 3D component design files (STL)
- Edge Impulse audio classification model (EIM binary for UNO Q)
- Hermes AI agent skill files (markdown)
Schematics
Pin connections layout generated by Google Gemini.
Code
Select File
- sketch.ino
- main.py
- index.js
- led_sequence.js
- socket.io.min.js
- index.css
- index.html
- led_sequence.html
- latest_figurine_market_analysis.md
- latest_figurine_market_analysis_updated_by_hermes.md
Custom assets
Assets
See on other platforms
Related projects
AI-driven Web-based Ancillary Lab Assistant | UNO Q & Gemini
Able to show sensor readings, identify users by fingerprint, detect lab equipment, generate lessons via Gemini, and talk via its dashboard.
A study on VLM-driven ceiling fan airflow analysis w/ Unity
Utilizing VLMs to determine dual fan configurations for optimum cooling based on LiDAR-oriented real-time airflow simulations on Unity.
AI-driven Plastic Surface Defect Detection via UV-exposure
Experimenting with different UV wavelengths and camera types to develop a feature-rich industrial anomaly detection mechanism with edge AI.
AI-driven LoRa & LLM-enabled Drive-through Kiosk & Food Delivery System
A research project on developing a full-fledged drive-through kiosk and food delivery system, utilizing LLMs to generate user-specific menus/deals.
A pest nest identification AI agent from a failed bee vacuum
Inspired to develop this local AI agent after failing to remove a yellowjacket nest with my custom bee vacuum due to my lack of knowledge :)